Old Fashioned Buttermilk Pie: Silky and Classic
- Time: Active 15 minutes, Passive 50 minutes, Total 65 minutes
- Flavor/Texture Hook: A shatter crisp caramelized crust over a silky, tangy custard
- Perfect for: Sunday brunch, holiday gatherings, or a comforting weeknight treat
- How to Bake a Flawless Buttermilk Pie Recipe
- Achieving the Best Texture and Flavor
- Understanding the Role of Key Ingredients
- Essential Tools for a Perfect Bake
- Detailed Steps for a Golden Finish
- Solving Common Custard Baking Issues
- Adjusting for Different Batch Sizes
- Debunking Traditional Baking Lore
- Preserving Freshness and Reducing Waste
- Perfect Presentation and Pairing Ideas
- Recipe FAQs
- 📝 Recipe Card
How to Bake a Flawless Buttermilk Pie Recipe
Forget everything you think you know about Southern desserts needing to be cloying or heavy enough to ground a plane. There’s a massive myth floating around that "old-fashioned" equals "complicated," but this buttermilk pie recipe is here to prove that theory wrong.
Most people assume you need fancy thickeners or a culinary degree to get that perfect custard set, but the magic actually lies in the most basic reaction between acid and eggs.
I remember the first time I pulled one of these out of the oven at my grandmother’s house. The aroma of nutmeg and warm sugar filled the kitchen, but I was convinced I'd messed it up because the top looked like a sheet of thin, crinkled parchment paper. I thought it was burnt!
But as it cooled, that mahogany surface settled into the most beautiful, delicate crust that shattered like glass under a fork. It was a revelation in textures, and I’ve been chasing that specific "shatter to velvet" transition ever since.
We’re going to walk through the steps to ensure your custard doesn't weep and your crust stays crisp. This isn't just about mixing ingredients; it’s about understanding how they interact to create that vibrant, tangy profile. If you've ever felt intimidated by custard pies, breathe easy.
We are keeping things simple, creative, and utterly delicious. Let’s get your oven preheated and dive into why this specific ratio of buttermilk to butter is the secret sauce of the dessert world.
Achieving the Best Texture and Flavor
Many bakers skip the most important part of this process: the aeration of the eggs. It is a common misconception that you can just whisk everything together in one go. If you want that signature "chess style" topping, you have to put in the work at the very beginning.
- Aeration Power: Beating the eggs for a full 3 minutes creates a foam that rises to the top during baking, forming that iconic crackly crust.
- Acid Interaction: The lemon juice isn't just for flavor; it reacts with the buttermilk to tighten the protein structure of the eggs, ensuring a clean slice.
- Sugar Dissolution: Gradually adding sugar to the egg foam prevents the custard from becoming grainy or "weepy" after it cools.
- Fat Stabilization: Cooling the melted butter before adding it prevents the eggs from curdling, which keeps the texture silky rather than scrambled.
| Servings | Egg Count | Buttermilk Volume | Pan Size |
|---|---|---|---|
| 4 People | 2 Large Eggs | 0.5 cup | 6 inch deep dish |
| 8 People | 3 Large Eggs | 1 cup | 9 inch deep dish |
| 12 People | 5 Large Eggs | 1.5 cups | 10 inch deep dish |
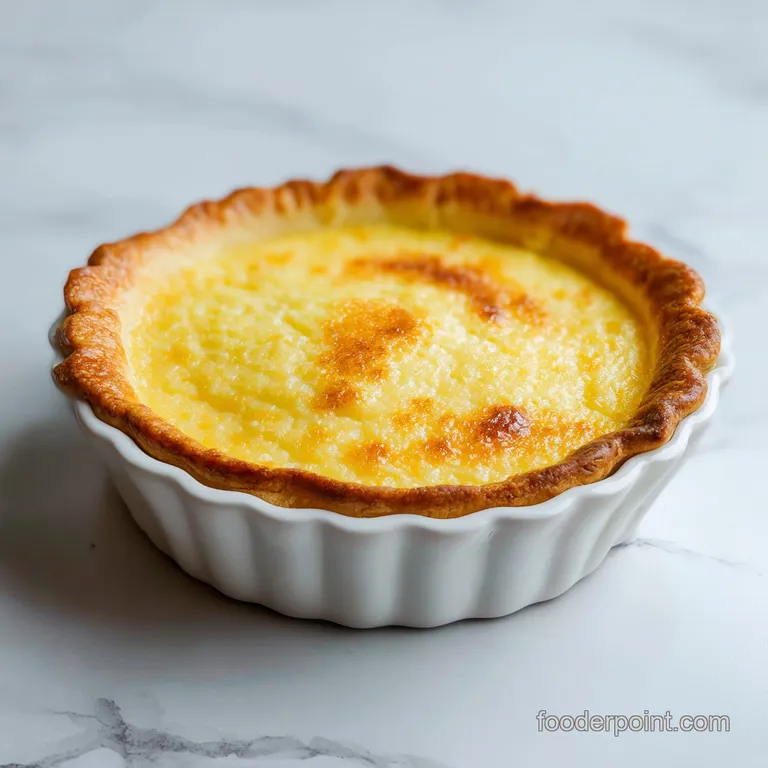
Choosing the right pan size is vital because the depth of the custard dictates the bake time. A standard 9 inch deep dish shell allows the center to stay creamy while the edges firm up perfectly. If you try to bake this in a shallow tart pan, you'll lose that contrast between the crisp top and the custardy interior.
This dish thrives on height and volume, allowing the heat to move slowly through the buttermilk mixture.
Understanding the Role of Key Ingredients
When we look at the components of this buttermilk pie recipe, it’s like looking at a flavor map of the South. We are balancing high fat dairy with sharp acidity and deep aromatics. It’s a delicate dance of contrasts: the richness of the butter against the brightness of the lemon.
| Ingredient | Science Role | Pro Secret |
|---|---|---|
| Full fat Buttermilk | Provides acidity for the "set" | Use room temp to avoid clumping butter |
| 3 Large Eggs | Structural binder and lift | Beat until pale yellow for a better crust |
| Vanilla Bean Paste | Flavor depth | Paste adds those beautiful tiny black flecks |
| Fine Sea Salt | Flavor enhancer | Sharpens the tang of the buttermilk |
Using vanilla bean paste instead of standard extract is a small change that makes a huge difference. The paste has a more concentrated, floral aroma that stands up to the tang of the buttermilk. If you’re planning a big dessert spread, this pie pairs beautifully with a creamy banana pudding because the tartness of the pie cuts through the richness of the pudding perfectly.
Essential Tools for a Perfect Bake
You don't need a kitchen full of high end gadgets to master this recipe, but a few specific tools will make your life significantly easier. First and foremost, an electric hand mixer or a stand mixer (like a KitchenAid) is non negotiable for the egg beating stage.
Doing this by hand is a workout that most of us aren't prepared for on a Sunday afternoon.
You will also want a sturdy baking sheet to place under your pie tin. This serves two purposes: it catches any potential spills and helps conduct heat evenly to the bottom of the crust.
A glass or ceramic pie dish is ideal because you can see the color of the crust as it bakes, ensuring you don't end up with a "soggy bottom." Finally,, a microplane is your best friend for that pinch of nutmeg; freshly grated nutmeg has volatile oils that pre ground powder simply cannot match.
Detailed Steps for a Golden Finish
1. The Oven Preparation
Preheat your oven to 350°F (175°C). Place a heavy baking sheet on the center rack while the oven warms up. Note: A preheated sheet gives the bottom crust an immediate blast of heat, preventing sogginess.
2. Beating the Eggs
In a large mixing bowl, beat the 3 large room temperature eggs with an electric mixer on medium high speed. Continue for 2–3 minutes until the eggs are pale yellow and significantly frothy.
3. Emulsifying Fats and Sugar
Gradually stream in the 1.5 cups of granulated sugar and the 0.5 cup of melted, cooled butter. Whisk constantly until the mixture looks glossy and the sugar begins to dissolve.
4. Adding Dry Components
Fold in the 3 tbsp of all purpose flour and 0.25 tsp of fine sea salt using a spatula. Mix gently until no white lumps of flour are visible.
5. Incorporating the Liquids
Whisk in the 1 cup of full fat buttermilk, 1 tbsp of lemon juice, 1 tsp of vanilla bean paste, and 0.125 tsp of freshly grated nutmeg. Continue until the custard is completely smooth and aerated.
6. Filling the Shell
Pour the prepared custard into your chilled, unbaked 9 inch deep dish pie shell. Note: Keeping the shell chilled prevents the butter in the pastry from melting before it hits the oven.
7. The Baking Process
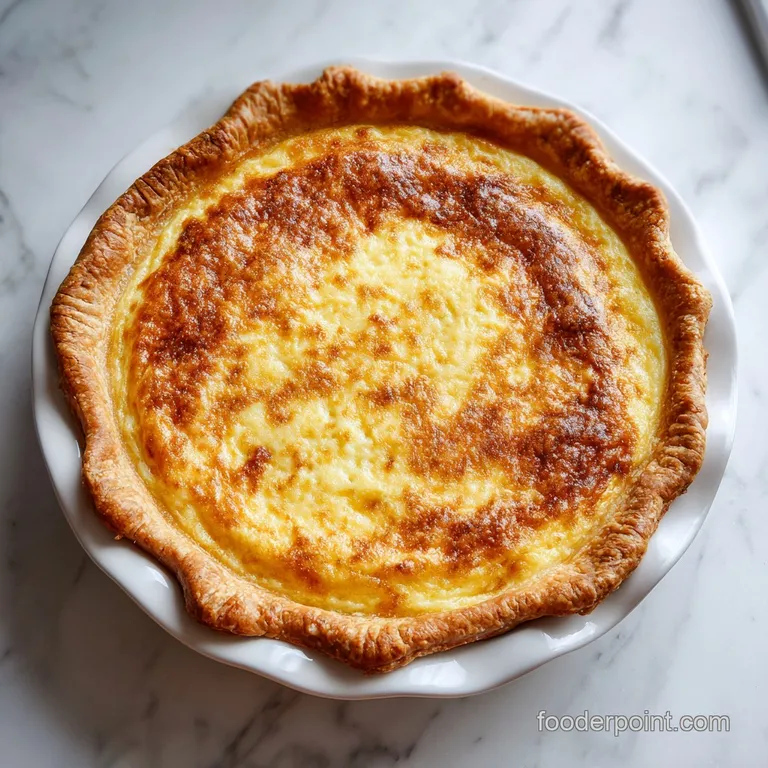
Carefully slide the pie onto the preheated baking sheet. Bake for 50 minutes until the top is a deep mahogany brown and the center has a slight, gelatinous jiggle.
8. The Cooling Phase
Transfer the pie to a wire rack. Let it cool completely for at least 2 hours until the custard is firm and set. Do not slice too early, or the filling will run!
Solving Common Custard Baking Issues
One of the biggest heartbreaks in baking is pulling a beautiful pie out of the oven only to have it collapse or stay liquid. If your buttermilk pie recipe isn't behaving, it's usually a temperature or timing issue. The "jiggle test" is your best indicator of success.
The pie should move like Jell O when nudged, not like a bowl of milk.
The Problem of the Liquid Center
If you cut into your pie and it spills out like soup, the eggs haven't reached the temperature necessary to coagulate. This often happens if the buttermilk was ice cold when added, which drops the overall temperature of the batter and requires a longer bake time.
| Problem | Root Cause | Solution |
|---|---|---|
| Weeping Filling | Overbaked eggs | Pull pie when center still jiggles slightly |
| Soggy Crust | Cold oven floor | Preheat a baking sheet to set the bottom |
| Cracked Surface | Cooling too fast | Avoid drafts; cool at room temp, not fridge |
Common Mistakes Checklist
- ✓ Using low-fat or skim buttermilk (this leads to a thin, watery custard).
- ✓ Skipping the flour (the flour acts as a stabilizer for the egg proteins).
- ✓ Adding hot melted butter to the eggs (this will cook the eggs instantly).
- ✓ Cutting the pie while it’s still warm (the custard only fully sets during the cooling process).
- ✓ Forgetting to preheat the baking sheet (this is the only way to ensure a crispy base).
Adjusting for Different Batch Sizes
If you are cooking for a smaller crowd, you can halve this recipe, but be careful with the egg ratio. I recommend beating three eggs together, then measuring out half of that mixture by weight or volume.
When you scale down, the bake time usually drops by about 15 percent, so start checking for that "jiggle" at the 40 minute mark.
For those hosting a massive dinner party, doubling the recipe works perfectly as long as you use two separate 9 inch pans. Do not try to bake one giant pie in a larger dish, as the edges will burn before the center even begins to set. If you are serving this alongside other treats like Southern pecan pie bars, you can even bake the buttermilk custard in a rectangular pan for "pie squares" to make serving easier.
| Fresh Version | Shortcut Version | Resulting Difference |
|---|---|---|
| Real Buttermilk | Milk + Vinegar | Less creamy, thinner texture |
| Vanilla Bean Paste | Imitation Extract | Flatter flavor, no visual specks |
| Freshly Grated Nutmeg | Pre ground Nutmeg | Woody aroma vs. bright spice |
Debunking Traditional Baking Lore
There is a persistent myth that you must blind bake (pre bake) the crust for a buttermilk pie. Honestly, don't even bother with that extra step here. Because we use a preheated baking sheet and a high fat filling, the bottom of the crust will crisp up beautifully without the extra 20 minutes of fuss.
Another common misconception is that buttermilk pie and chess pie are the same thing. While they are cousins, they aren't twins! Chess pie relies on cornmeal for texture and usually contains more sugar and no buttermilk. This buttermilk pie recipe is much lighter, tangier, and has a more "custard forward" mouthfeel.
Don't let someone tell you they are interchangeable; the acid in the buttermilk completely changes the chemistry of the bake.
Preserving Freshness and Reducing Waste
This pie is a trooper when it comes to storage. It actually tastes even better on day two because the nutmeg and vanilla have more time to mingle with the tangy buttermilk.
- Fridge: Store in an airtight container for up to 4 days. The crust will lose some of its "shatter," but the flavor remains vibrant.
- Freezer: You can freeze this pie for up to 2 months. Thaw it slowly in the fridge overnight to prevent the custard from separating.
- Zero Waste Tip: Don't throw away that lemon peel! Zest it into a small jar of sugar to create "lemon sugar" for your next batch of cookies or to rim a glass of iced tea.
- Leftover Crust: If you have scraps of dough, roll them in cinnamon sugar and bake them alongside the pie for a little "chef’s snack."
Perfect Presentation and Pairing Ideas
When it's time to serve, keep it simple. A dollop of unsweetened whipped cream is the classic choice because it doesn't compete with the sweetness of the pie. If you want to go "bistro style," a side of macerated raspberries or blackberries adds a beautiful pop of color and a fresh, tart contrast to the rich custard.
The Classic Southern Pairing
In the South, we often serve this with a strong, dark roast coffee. The bitterness of the coffee is the perfect foil for the sugary, crackly top of the pie. It’s a combination that has stood the test of time for a reason.
The Modern Twist
If you’re feeling adventurous, try a tiny sprinkle of flaky sea salt on top right before serving. It sounds strange for a dessert, but it makes the vanilla and nutmeg flavors absolutely sing. Trust me on this it’s the creative touch that will have your friends asking for the recipe. If you're looking for another creamy delight to round out your dessert table, my buttermilk vanilla cupcakes offer a similar tangy sweet profile in a handheld format!
Recipe FAQs
What's the difference between a chess pie and a buttermilk pie?
Buttermilk pie relies on the acidity of the buttermilk to set the custard, while chess pie uses cornmeal for body. Both utilize a similar base of sugar, eggs, and butter, but buttermilk pie offers a brighter, tangier flavor profile.
What ingredients do I need for buttermilk pie?
You need 3 large eggs, 1.5 cups granulated sugar, 0.5 cup melted butter, 3 tbsp flour, 1 cup full fat buttermilk, 1 tbsp lemon juice, 1 tsp vanilla bean paste, 0.25 tsp sea salt, 0.125 tsp nutmeg, and a 9 inch deep dish shell. Always use full fat buttermilk to prevent a watery texture.
Is it true Dolly Parton has a favorite pie?
Yes, this is a well-known culinary fact. Dolly Parton has famously identified buttermilk pie as her personal favorite, largely due to its nostalgic Southern roots.
Does a buttermilk pie need to be refrigerated?
Yes, you must refrigerate it after it has fully cooled. Because the custard contains eggs and dairy, it should be stored in the refrigerator to remain safe to eat.
Why is my custard watery?
You likely used low-fat buttermilk or skipped the flour. The flour is essential for stabilizing the egg proteins, and full fat buttermilk is necessary to provide the structure for a firm, creamy slice.
How to ensure a crispy bottom crust?
Place your pie pan onto a preheated baking sheet inside the 350°F oven. This thermal transfer from the hot metal ensures the bottom of the crust cooks through before the custard sets, a technique similar to how we achieve a buttery golden crust in other baked desserts.
How to tell when the pie is done?
Bake until the top is deep mahogany brown and the center has a slight, gelatinous jiggle. If the center still moves like liquid, it needs more time, but remember that the custard will finish setting completely during the 2-hour cooling period.
Classic Southern Buttermilk Pie

