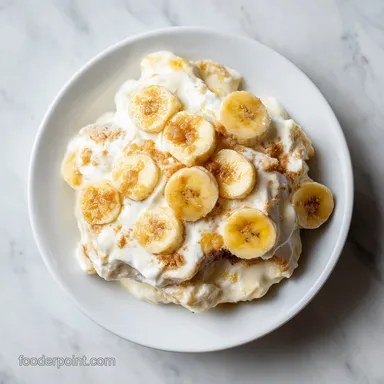
Magnolia Bakery Banana Pudding: Creamy and Classic
- Time: Active 20 minutes, Passive 6 hours, Total 6 hours 20 minutes
- Flavor/Texture Hook: Airy, pillowy cream contrasted with softened, sponge like vanilla wafers and sweet, buttery bananas.
- Perfect for: Summer potlucks, birthday celebrations, or when you need a high impact dessert with zero oven time.
- Creating the Iconic Magnolia Bakery Banana Pudding Recipe
- Why This No Bake Method Creates Magic
- The Core Components for Authentic NYC Flavor
- Essential Stats for a Perfect Crowd-Pleasing Dessert
- Tools Required for a Velvety Smooth Finish
- Step-By-Step Assembly for the Ultimate Pudding
- Troubleshooting Your Creamy Banana Pudding Layers
- Strategies for Different Batch Sizes
- Debunking Common Kitchen Myths
- Storage Rules to Maintain That Perfect Texture
- How to Style Your Pudding Like a Pro
- Recipe FAQs
- 📝 Recipe Card
Creating the Iconic Magnolia Bakery Banana Pudding Recipe
I still remember the first time I walked into that little bakery on West 11th Street in Manhattan. The air was thick with the scent of buttercream and ripe fruit, and everyone in line was clutching a little plastic cup like it was gold. When I finally took a bite, I realized why.
It wasn't just "pudding" in the way we think of the snack packs from our lunchbox days. It was something else entirely a trifecta of airy cream, softened cookies, and fruit that somehow tasted better than the sum of its parts. I went home obsessed with recreating that exact velvet on-the tongue feeling.
The true hero of this magnolia bakery banana pudding recipe isn't actually the banana, it is the instant vanilla pudding mix. Now, I know what you're thinking. As a home cook who usually makes everything from scratch, using a boxed mix felt like cheating.
I tried making a fancy egg yolk custard version from scratch, but it was too heavy. It didn't have that "cloud" quality. The instant mix, when combined with ice cold water and sweetened condensed milk, creates a specific stability that allows the whipped cream to hold its shape for days without weeping.
It provides a structural backbone that homemade stovetop pudding just can't match for this specific application.
We are looking for a very specific contrast here. You want the wafers to lose their "snap" and become tender, almost like a Genoise sponge cake. This happens through a process of moisture migration, where the cookies drink up the liquid from the cream and pudding.
If you eat it too soon, the cookies are still crunchy and it feels disjointed. If you wait just long enough, about six hours, the whole thing becomes one cohesive, heavenly scoop. Trust me, the wait is the hardest part, but it's where the magic happens.
Why This No Bake Method Creates Magic
Understanding why this recipe behaves the way it does will help you avoid the common pitfall of a "soupy" pudding. It’s all about temperature and air management.
- Starch Hydration: The instant pudding mix contains pre gelatinized starch that thickens instantly when it hits liquid. Using ice cold water slows down the initial thickening just enough to let you whisk out every single lump, resulting in a perfectly smooth base.
- Fat Stability: Sweetened condensed milk isn't just for sweetness; it provides a high concentration of milk solids and fats that help emulsify the mixture, creating a dense, rich foundation that won't break down when you add the airy cream.
- Aeration Retention: By whipping the heavy cream to stiff peaks and gently folding it into the chilled pudding, you are trapping millions of tiny air bubbles. This is what gives the dessert its signature "mousse like" lightness rather than a heavy, gelatinous feel.
- Moisture Equilibrium: Over the 6 hours of chilling, the vanilla wafers undergo a controlled softening. The sugar in the pudding pulls moisture into the dry starch of the cookies, creating a texture that mimics a moist layer cake.
| Servings | Ingredient Adjustments | Pan Size | Cook Time |
|---|---|---|---|
| 6-8 people | Half all ingredients (use 1.5 cups cream) | 2 quart bowl | 6 hours (chill) |
| 14 people | 1 box pudding, 1 can milk, 3 cups cream | 4 quart bowl | 6 hours (chill) |
| 28 people | 2 boxes pudding, 2 cans milk, 6 cups cream | Two 9x13 pans | 6 hours (chill) |
This serving guide helps you plan for everything from a quiet Sunday dinner to a massive backyard bash. If you are feeding a crowd, the 9x13 pan method is much easier for scooping and transporting than a tall, heavy glass trifle dish.
The Core Components for Authentic NYC Flavor
Selecting the right ingredients is the difference between a "good" dessert and one that people talk about for weeks. You cannot compromise on the temperature of your cream or the ripeness of your fruit. If you love these classic flavors, you should definitely check out my Southern Pecan Pie Bars for another crowd pleaser that fits the same nostalgic vibe.
| Component | Role | Pro Secret |
|---|---|---|
| Sweetened Condensed Milk | Sweetness & Body | Use a brand like Eagle Brand for a consistent, thick viscosity that sets up firmly. |
| Instant Vanilla Pudding | Structure & Flavor | It must be Instant, not "Cook and Serve," or it will never thicken in the fridge. |
| Heavy Whipping Cream | Volume & Lightness | Ensure it is at least 36% fat and straight from the fridge so it whips to maximum volume. |
| Ripe Bananas | Natural Flavor | Look for bright yellow with just a few brown speckles; fully green or fully black will ruin the taste. |
Each part of this dish plays a specific role in the texture. The water must be "ice cold" I usually put a few ice cubes in a measuring cup, fill it with water, and let it sit for two minutes before measuring out the 1.5 cups. This ensures the pudding doesn't set too fast while you are still whisking.
Essential Stats for a Perfect Crowd Pleasing Dessert
Before you start, make sure you have everything ready. This isn't a "wing it" kind of recipe. The ratios are precise for a reason.
Ingredients List: 1 can (14 oz) sweetened condensed milk Why this? Provides the signature creamy, caramelized sweetness that defines the bakery style. 1.5 cups ice cold water Why this? Activates the instant pudding starch without creating
Premature lumps. 1 box (3.4 oz) instant vanilla pudding mix Why this? Acts as the stabilizer that keeps the whipped cream from deflating. 3 cups heavy whipping cream, chilled Why this? High fat content is necessary to reach the "stiff peak" stage for
Structure. 1 tsp pure vanilla extract Why this? Enhances the floral notes of the bananas and the richness of the cream. 1 box (11 oz) vanilla wafers Why this? Their high starch content allows them to soften into "cake" without falling apart. 5
Large ripe bananas, sliced Why this? Provides the fresh, aromatic fruit component and natural sweetness.
| Original Ingredient | Substitute | Why It Works |
|---|---|---|
| Vanilla Wafers | Graham Crackers | Similar honey sweet profile. Note: Will result in a slightly crunchier texture and darker color. |
| Heavy Cream | Frozen Whipped Topping | Pre stabilized. Note: Much sweeter and lacks the fresh dairy mouthfeel of real cream. |
| Instant Vanilla Pudding | Instant Banana Pudding | Boosts fruit flavor. Note: Can taste slightly more artificial than the classic version. |
While I always recommend the classic Nilla Wafers, I have seen friends use shortbread cookies in a pinch. Just know that shortbread has a higher fat content, so it won't absorb the moisture quite as quickly as a standard vanilla wafer will.
Tools Required for a Velvety Smooth Finish
You don't need a lot of high tech gear, but a few specific items will make the process much smoother.
- Large Mixing Bowl: For the pudding base. Glass or ceramic is great here.
- Chilled Metal Bowl: I always put my whisk and metal bowl in the freezer for 10 minutes before whipping the cream. Cold metal keeps the fat in the cream solid, leading to faster, more stable peaks.
- Electric Hand Mixer or Stand Mixer: Whipping 3 cups of heavy cream by hand is a workout you probably don't want. A KitchenAid stand mixer with the whisk attachment is my go to.
- Silicone Spatula: Essential for the "folding" step. You need something flexible to scrape the bottom of the bowl without crushing the air bubbles.
- Trifle Dish or 9x13 Glass Dish: A 4 quart trifle bowl shows off those beautiful layers, but a standard baking dish works perfectly for easy scooping.
Chef Tip: Slice your bananas just before you are ready to layer. If you slice them too early, they will oxidize and turn brown. If you must slice them ahead of time, toss them very gently in a teaspoon of lemon juice to slow down the browning.
Step-by-step Assembly for the Ultimate Pudding

Follow these steps exactly, especially the chilling times. This is one recipe where you simply cannot rush the clock.
- Combine the sweetened condensed milk and ice cold water in a large bowl. Beat with a whisk or hand mixer until the two are perfectly combined and look like a thin, uniform milk.
- Sprinkle the instant vanilla pudding mix over the liquid. Whisk vigorously for 2 full minutes. Note: It should be completely smooth with no yellow clumps.
- Cover the pudding bowl tightly with plastic wrap. Place it in the refrigerator for at least 3 hours. Note: This allows the starch to fully hydrate so the pudding becomes very firm.
- Once the pudding is set, place your chilled heavy cream and vanilla extract into a cold metal bowl. Beat on medium high speed.
- Watch the cream closely. Stop when it reaches stiff peaks. This means when you lift the whisk, the cream stands straight up without drooping. Don't overbeat, or you'll end up with butter.
- Remove the firm pudding from the fridge and give it a quick stir to loosen it. Gently fold the pudding into the whipped cream using a spatula. Note: Use a "cut and fold" motion cut through the center, scrape the bottom, and flip over.
- Start your layers in a 4 quart dish. Place one third of the vanilla wafers on the bottom, covering the surface completely.
- Add one third of the sliced bananas in an even layer over the cookies.
- Spread one third of the pudding cream mixture over the bananas, smoothing it out to the edges to seal them in.
- Repeat the layers twice more, ending with a smooth layer of the cream on top.
- Cover tightly with plastic wrap and refrigerate for a minimum of 4 hours, though 6 to 24 hours is the sweet spot for the best texture.
Troubleshooting Your Creamy Banana Pudding Layers
Even the simplest recipes can have hiccups. Usually, it comes down to a few small mistakes during the mixing or chilling phase.
Why Your Pudding Is Runny
If your final result is more like a soup than a thick mousse, the culprit is usually the whipping cream. If the cream wasn't whipped to stiff peaks, or if the pudding base wasn't fully chilled and set before folding, the mixture will collapse.
Also, check your pudding box if you accidentally bought "Cook and Serve" instead of "Instant," it will never set up with cold water.
Why Your Bananas Turned Grey
This is the most common visual complaint. Bananas turn brown when exposed to air (oxidation). To prevent this, make sure your pudding layers go all the way to the edge of the bowl, effectively "sealing" the bananas inside so no air can reach them.
Also, use bananas that are ripe but still firm; overripe, mushy bananas brown much faster.
| Problem | Root Cause | Solution |
|---|---|---|
| Lumpy Pudding Base | Added pudding mix too slowly or water wasn't cold. | Use a whisk and beat for the full 2 mins. Strain through a mesh sieve if lumps persist. |
| Grainy Whipped Cream | Cream was overbeaten toward butter. | If just starting to grain, whisk in 1-2 tbsp of fresh liquid cream to smooth it out. |
| Soggy/Mushy Wafers | Left in the fridge for more than 48 hours. | Serve within the 4-24 hour window for the "cake like" ideal. |
Common Mistakes Checklist:
- ✓ Use "Instant" pudding mix only; Cook and Serve will fail here.
- ✓ Ensure the water is truly ice cold to control the starch reaction.
- ✓ Chill the pudding base for at least 3 hours do not skip this!
- ✓ Stop whipping the cream the moment it holds its shape to avoid graininess.
- ✓ Cover the dish tightly with plastic wrap to prevent the cream from absorbing fridge odors.
Strategies for Different Batch Sizes
If you are cooking for a smaller household or a massive party, you need to adjust more than just the quantities. Got extra bananas after scaling? Use them up in this soft Banana Cookies recipe.
Scaling Down (Half Recipe): When making a half batch, you can use a standard 2 quart mixing bowl or even individual mason jars. The chilling time remains the same because the physics of the starch hydration and wafer softening doesn't change just because the bowl is smaller.
Use a small hand whisk instead of a large stand mixer to ensure you are reaching all the ingredients in the bottom of the bowl.
Scaling Up (Double Recipe): If you are doubling this for a graduation party or a large wedding shower, work in batches for the whipped cream. Most home stand mixers can only handle about 4-6 cups of heavy cream at a time before they lose efficiency.
Whip the cream in two separate goes, then fold them into a giant batch of the pudding base. For the layers, use two 9x13 pans rather than one giant deep dish, as the weight of a double batch can actually crush the bottom layers of wafers into a paste.
| Method | Total Time | Texture | Best For |
|---|---|---|---|
| Trifle Bowl | 6 hours 20 mins | Pillowy & layered | Dinner parties/Showstoppers |
| Individual Jars | 6 hours 20 mins | Consistent ratio | Picnics/Grab and-go |
| 9x13 Pan | 6 hours 20 mins | Evenly distributed | Large potlucks/Office parties |
Debunking Common Kitchen Myths
There are a few "old wives' tales" about banana pudding that often lead people astray. Let's clear those up so your magnolia bakery banana pudding recipe turns out perfect every time.
One common myth is that adding lemon juice to the bananas will make the whole pudding taste sour. While a tiny bit of citrus helps prevent browning, you don't need much. If you layer correctly and seal the bananas with the pudding mixture, the lack of oxygen will do 90% of the work for you.
You won't even taste the lemon if you use just a light spritz.
Another misconception is that "the longer it sits, the better it gets." This isn't true past the 24 hour mark. While the wafers need at least 4-6 hours to soften, after 48 hours, they begin to disintegrate into a mushy paste, and the bananas will start to release moisture (weeping), making the pudding watery.
There is a "sweet spot" for texture that you don't want to miss.
Storage Rules to Maintain That Perfect Texture
This is a fresh dairy dessert, so it needs to be treated with care. It’s not like a pound cake that can sit on the counter.
Storage: Always keep the pudding in the refrigerator. Use plastic wrap pressed directly onto the surface of the pudding to prevent a "skin" from forming on the cream. It will stay fresh and delicious for up to 2 days.
Beyond that, the bananas will start to lose their structure and the wafers will get too soft.
Zero Waste Tips: If you have leftover vanilla wafers, crush them up and store them in a freezer bag; they make an incredible crust for a cheesecake or a topping for yogurt. If you have extra bananas that are getting too ripe, peel them and freeze them for smoothies or banana bread.
Freezing: Honestly, don't do it. This recipe does not freeze well. The emulsion of the pudding and whipped cream will break when it thaws, leaving you with a watery, grainy mess. This is a dish meant to be enjoyed fresh and cold.
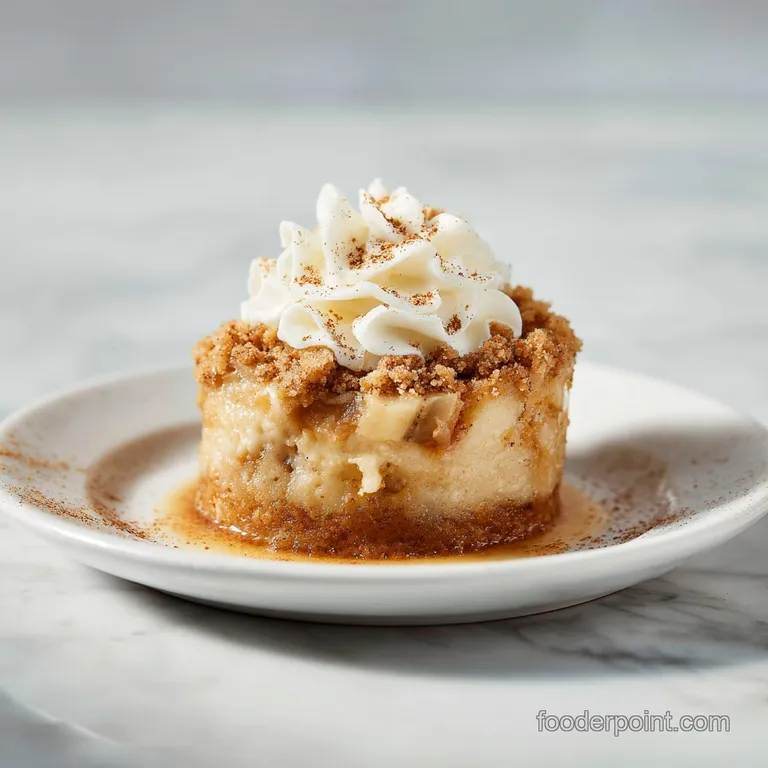
How to Style Your Pudding Like a Pro
The beauty of a trifle dish is seeing those distinct layers. To get that "bakery look," press your vanilla wafers and banana slices right up against the glass as you layer. This creates a beautiful pattern that is visible from the outside.
For the top layer, I like to save a few of the vanilla wafers and crush them into a fine crumble. Sprinkle this over the top just before serving to add a tiny bit of textural contrast.
You can also add a few fresh banana slices on top at the very last second since these aren't buried in the pudding, only add them right as you put the dish on the table so they stay bright and yellow.
If you are feeling extra fancy, you can pipe the final layer of whipped cream using a large round tip. This gives it a professional, "finished" appearance that looks much more expensive than a simple boxed pudding recipe has any right to look.
It's the contrast of the humble ingredients and the elegant presentation that makes this dish such a winner. Pair it with a cup of strong coffee to cut through the sweetness, and you've got the ultimate NYC dessert experience right in your own kitchen.
Recipe FAQs
What's in Magnolia Bakery banana pudding?
This recipe uses seven core ingredients: sweetened condensed milk, ice-cold water, instant vanilla pudding mix, heavy whipping cream, pure vanilla extract, vanilla wafers, and sliced ripe bananas.
How to recreate Magnolia Bakery banana pudding?
Whisk the sweetened condensed milk with ice-cold water, then beat in the pudding mix for two minutes until smooth. Chill this mixture for at least three hours before folding it into stiffly whipped cream and layering the custard with bananas and wafers.
How good is Magnolia Bakery banana pudding?
It is widely considered the gold standard for banana pudding because the mandatory 4 to 24-hour chilling period transforms the cookies into a luxurious, cake like texture that pairs perfectly with the airy whipped cream.
What kind of cookies does Paula Deen use in her banana pudding?
This specific recipe calls exclusively for standard vanilla wafers. If you enjoyed learning how the starch in these wafers softens to create a unique sponge cake consistency, you will appreciate how different starches behave in our dump cake recipe.
Is it true I should use milk instead of water for the pudding base?
No, this is a common misconception. You must use the 1.5 cups of ice-cold water as directed to achieve the correct structural set and sweetness balance intended by the original recipe.
How to prevent the bananas from turning brown?
Slice the bananas immediately before assembly and ensure they are fully submerged or covered by the pudding mixture during the layering process to limit oxygen exposure.
How to tell if the whipped cream is ready for folding?
Beat the chilled cream until stiff, upright peaks form on your whisk, but stop immediately once the texture is sturdy to avoid the mixture becoming grainy or turning into butter.
Magnolia Bakery Banana Pudding