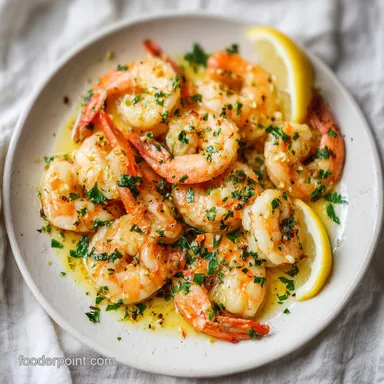
Garlic Butter Shrimp: Silky Sauce Recipe
- Time: Active 5 mins, Passive 5 mins, Total 10 mins
- Flavor/Texture Hook: Silky, garlic forward sauce with succulent, snap tender shrimp
- Perfect for: High speed weeknight dinners or impressive date night appetizers
- How to Make the Best Garlic Butter Shrimp
- The Science of Silky Pan Sauces
- Component Analysis for Better Flavor
- Essential Elements and Simple Substitutes
- The Best Tools for Searing
- Step by Step Guide to Quick Searing
- Troubleshooting Texture and Flavor Issues
- Adaptation and Scaling Guidelines
- Debunking Searing and Seasoning Rumors
- Fridge Guidelines and Waste Prevention
- The Best Sides for Seafood
- Recipe FAQs
- 📝 Recipe Card
How to Make the Best Garlic Butter Shrimp
The sharp, aromatic hiss of garlic hitting hot olive oil is easily one of the most comforting sounds in my kitchen. It’s that specific moment where the air transforms, smelling like a high end bistro even if you’re just in your pajamas on a Tuesday night.
I remember the first time I tried to make this for my partner back in our tiny first apartment. I was so worried about undercooking the seafood that I ended up with what felt like rubber erasers drowned in yellow oil. It was a mess, but it taught me everything about the balance of heat and timing.
We’ve all been there, hovering over the stove and wondering if the shrimp are "done enough." This Garlic Butter Shrimp is the result of years of trial and error, specifically learning that the secret isn't in fancy equipment, but in how you handle the fat.
I’ve realized that the most succulent results come from a quick, over high heat sear followed by a gentle finish with cold butter. It’s a technique that feels a bit backwards until you see that sauce come together into something truly glossy and rich.
You’re going to love how the lemon juice cuts through the richness, leaving you with a plate that's bright, bold, and surprisingly light.
The Science of Silky Pan Sauces
Cold Fat Emulsification: Adding cold butter to a warm liquid creates a stable emulsion where the milk solids suspend in the liquid, resulting in a creamy glaze rather than a separated, oily mess.
The Maillard Reaction: High surface heat quickly browns the exterior of the shrimp, creating complex flavor compounds before the internal proteins can over coagulate and become tough.
Acidic Brightening: The lemon juice and white wine act as surfactants, breaking through the heavy lipid layers of the butter to refresh the palate and highlight the sweetness of the seafood.
| Method | Total Time | Resulting Texture | Best Used For |
|---|---|---|---|
| Stovetop Skillet | 10 minutes | Maximum sear, golden crust, silky pan sauce | Traditional scampi style or pasta toppers |
| oven roasted | 12 minutes | Evenly cooked, less mess, thinner sauce | Sheet pan meals with hearty vegetables |
| Air Fryer | 8 minutes | Extra snap to the skin, very little sauce | Low calorie snacking or salads |
Choosing the right path depends on your goals for the evening. If you want that classic, glossy coating that clings to every nook and cranny, the stovetop is your best friend. It allows for the "Butter Swirl" which is the backbone of this recipe. Similar to the logic we use for a Garlic Butter Steak recipe, the interaction between the hot pan and the finishing fat is what creates that signature restaurant finish.
Component Analysis for Better Flavor
| Ingredient | Science Role | Pro Secret |
|---|---|---|
| Large Shrimp | Primary protein with high moisture content | Pat them with paper towels until the towel actually sticks to the flesh for a better sear. |
| Cold Butter | Emulsifying agent and flavor carrier | Keep it in the fridge until the very second you need it; the temperature difference builds the sauce. |
| Dry White Wine | Solvent for browned bits (deglazing) | Use a Pinot Grigio or Sauvignon Blanc to add a crisp acidity that mimics professional kitchen results. |
| Fresh Garlic | Aromatic base | Mince it by hand rather than using a press to prevent the oils from turning bitter and acrid. |
Essential Elements and Simple Substitutes
To get this right, you'll need a few key players. Each one serves a purpose, from the structural integrity of the sauce to the aromatic finish that hits you before you even take a bite.
- 1.5 lbs large shrimp: Peeled and deveined. Why this? Larger sizes stay juicy during the over high heat sear without overcooking instantly.
- Substitute: Scallops work beautifully here, though they require a slightly longer sear.
- 4 tbsp unsalted butter: Cubed and cold. Why this? Unsalted allows you to control the seasoning precisely at the end.
- Substitute: Ghee provides a nuttier flavor but won't create the same creamy emulsion.
- 6 cloves garlic: Freshly minced. Why this? Pre minced jarred garlic lacks the pungent bite needed to stand up to the butter.
- Substitute: 1 tsp garlic powder mixed with 1 tsp onion powder in a pinch.
- 0.25 cup dry white wine: For deglazing. Why this? It lifts the fond (browned bits) from the pan into the sauce.
- Substitute: Chicken broth with an extra teaspoon of lemon juice.
- 2 tbsp extra virgin olive oil: high-quality oil.
- Substitute: Avocado oil for a higher smoke point if your stove runs very hot.
- 1 small shallot: Finely diced.
- Substitute: The white parts of two green onions.
- 0.5 tsp crushed red pepper flakes: For a subtle warmth.
- 0.5 tsp kosher salt and 0.25 tsp black pepper: For basic seasoning.
- 1 tbsp fresh lemon juice: To finish.
- 2 tbsp fresh parsley: Chopped fine for a herbaceous lift.
The Best Tools for Searing
You don't need a professional kitchen, but a heavy bottomed pan is non negotiable here. A 12 inch cast iron or stainless steel skillet is the gold standard. These materials hold onto heat effectively, meaning when you drop 1.5 lbs of cold shrimp into the pan, the temperature doesn't plummet.
If the pan cools down, your shrimp will boil in their own juices instead of searing, leading to a gray, rubbery texture.
A fish spatula or a good pair of tongs is also essential. You want to be able to flip the shrimp individually and quickly. Since we are only cooking them for about two minutes per side, every second counts. Finally,, have a small whisk or a wooden spoon ready for the deglazing phase.
You want to be able to scrape up every single bit of flavor from the bottom of the skillet once that wine hits the heat.
Step by step Guide to Quick Searing

Preparation of the Protein
Dry the 1.5 lbs of shrimp thoroughly using paper towels. Note: Surface moisture is the enemy of a golden crust. Season them evenly with the 0.5 tsp salt and 0.25 tsp pepper right before they hit the heat.
Initial High Heat Sear
Heat the 2 tbsp olive oil in your skillet over medium high heat until the oil shimmers and barely begins to smoke. Add the shrimp in a single layer, ensuring they aren't crowded.
The Flip and First Pull
Cook for 2 minutes until the bottoms are pink and slightly charred. Flip and cook for another 1 minute. Remove the shrimp to a plate while they are still slightly translucent in the very center. Note: They will finish cooking in the sauce later.
Building the Aromatic Base
Reduce the heat to medium and add 1 tbsp of the butter. Sauté the diced shallot and 6 cloves of minced garlic for about 1 minute until the aroma fills the room and the shallots turn translucent.
Deglazing the Skillet
Pour in the 0.25 cup of white wine and 0.5 tsp red pepper flakes. Use your spoon to scrape the bottom of the pan until the liquid reduces by half and smells slightly sweet.
Creating the Butter Emulsion
Turn the heat to low. Add the remaining 3 tbsp of cold, cubed butter one piece at a time, whisking constantly. Note: This creates the "velvet" texture of the sauce.
The Final Marriage
Add the 1 tbsp lemon juice to the pan. Toss the shrimp and any accumulated juices back into the skillet.
Finishing the Dish
Cook for 1 more minute until the shrimp are opaque and curled into a loose "C" shape.
Garnish and Serve
Remove from heat immediately. Sprinkle with the 2 tbsp fresh parsley and serve while the sauce is still emulsified and glossy.
Troubleshooting Texture and Flavor Issues
Visual Cues for Proper Doneness
Shrimp are communicative little things. If they look like a "U," they are perfectly tender. If they've curled tightly into an "O," you've gone too far, and they'll be tough. The goal is to catch them right as the vein at the back turns opaque.
Importance of Surface Moisture
If your shrimp are steaming rather than searing, it’s almost always because they weren't dry enough. Even a tiny bit of water creates a buffer of steam that prevents the Maillard reaction. This results in a "boiled" flavor that lacks depth.
The Logic of Cold Butter
If your sauce looks like melted yellow wax, the pan was likely too hot when you added the butter. The heat broke the emulsion, separating the fat from the solids. You can sometimes save this by adding a splash of water and whisking vigorously off the heat.
| Problem | Root Cause | Solution |
|---|---|---|
| Bitter Taste | Garlic was burned during the sauté | Start over or add a pinch of sugar; next time, add garlic only when heat is reduced. |
| Tough Shrimp | Overcooked or heat was too low | Pull shrimp earlier; they carry over heat. Ensure the pan is screaming hot for the sear. |
| Thin/Watery Sauce | Wine didn't reduce enough | Simmer the wine for an extra 60 seconds before adding the butter cubes. |
Common Mistakes Checklist
- ✓ Never crowd the pan; if the shrimp touch, they steam instead of searing.
- ✓ Don't use a non stick pan if you want a true sear; stainless steel is better for building flavor.
- ✓ Avoid moving the shrimp for the first 90 seconds to allow the crust to form.
- ✓ Use cold butter only; room temperature butter melts too fast to emulsify.
- ✓ Add the lemon juice at the very end to keep the flavor vibrant and fresh.
Adaptation and Scaling Guidelines
Reducing for Two
When cutting this recipe in half, use a smaller 8 inch or 10 inch skillet. Keep the amount of wine and lemon juice roughly the same, as you need a certain volume of liquid to create an emulsion. Reduce the cooking time for the aromatics by about 30%, as they will brown much faster in a smaller batch.
Feeding a Crowd
If you are doubling this to 3 lbs of shrimp, you must work in batches. Sear half the shrimp, remove them, then do the second half. If you put all 3 lbs in at once, the temperature of the pan will drop, and you’ll end up with a watery mess. For another great crowd pleasing seafood option, the Oven Baked Salmon recipe is a fantastic sheet pan alternative that handles larger quantities with less active stovetop time.
Liquid Adjustments for Bulk
When doubling the recipe, do not double the white wine. Use about 1.5 times the amount (roughly 6 tablespoons) instead of a full half cup. Too much liquid will drown the shrimp and make the butter emulsion too thin to cling properly.
Debunking Searing and Seasoning Rumors
One of the biggest myths in seafood is that you should salt the shrimp a long time before cooking. In reality, salt draws out moisture. If you salt them 20 minutes early, the surface will be wet again by the time they hit the pan.
Season them literally seconds before they go into the oil for the best results.
Another common misconception is that "fresh" shrimp at the grocery store counter is better than frozen. In most cases, the shrimp at the counter was previously frozen and thawed. Buying a high-quality bag of frozen, shell on shrimp allows you to thaw them yourself right before cooking, which often results in a much fresher snap.
Fridge Guidelines and Waste Prevention
Storing for Later
Store any leftovers in an airtight glass container in the fridge for up to 2 days. When reheating, avoid the microwave at all costs. It will turn your succulent shrimp into rubber.
Instead, place them in a small pan over very low heat with a splash of water or broth, covering the pan to let the steam gently warm them through.
Zero Waste Tips
Don't throw away the lemon rinds! If you have leftovers, zest the lemon into the storage container to keep the flavors bright. If you bought shrimp with the shells on, save the shells in a freezer bag. They make an incredible base for a quick seafood stock or a risotto liquid later in the week.
The parsley stems can also be finely chopped and added to the shallot sauté for extra flavor.
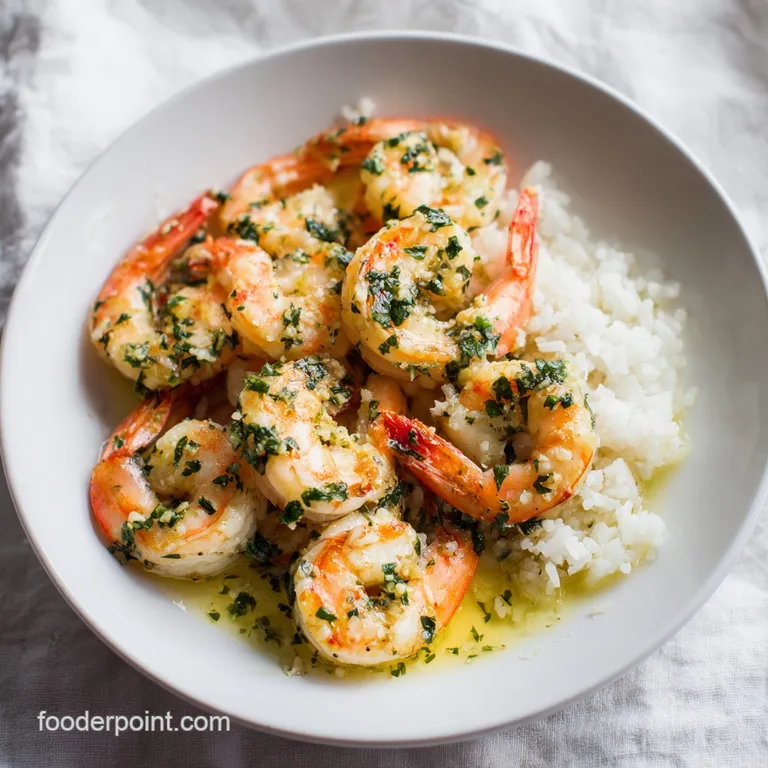
The Best Sides for Seafood
While this dish is a powerhouse on its own, it really shines when paired with something that can soak up that liquid gold sauce. A crusty baguette is the most traditional choice, but I’ve found that a bed of angel hair pasta or a simple lemon risotto works wonders.
If you are looking for a more vegetable forward meal, roasted broccoli or sautéed asparagus provides a nice crunch that offsets the softness of the seafood. For those who want a bit more variety on the table, I often suggest looking at how different proteins handle similar fat profiles, much like we see in the Garlic Mushroom Pasta recipe. The earthiness of the mushrooms provides a brilliant contrast to the sweet, briny notes of the shrimp. Just make sure whatever you serve has enough acidity to balance out that luxurious butter sauce we worked so hard to build!
Recipe FAQs
How to make garlic buttered shrimp?
Sear the shrimp quickly over high heat until lightly browned. Remove the shrimp, then sauté minced garlic and shallots in the pan until fragrant. Deglaze with white wine, reduce slightly, then whisk in cold butter cubes off the heat to create an emulsion.
Return the shrimp to coat in the glossy sauce.
How do you pan fry shrimp with garlic and butter?
Heat olive oil until shimmering, then sear the dried shrimp for 2 minutes per side. Remove the shrimp, lower the heat, and cook the garlic and shallots. Deglaze the pan with wine, then swirl in cold butter cubes one by one until a thick sauce forms. This technique of incorporating cold fat is key to stability; if you enjoyed mastering this emulsification here, see how the same principle works in our Creamy Tomato Basil recipe.
How does Gordon Ramsay make garlic butter?
Ramsay emphasizes using high heat for the sear, followed by cold, cubed butter added off the heat. He relies on the quick temperature difference to prevent the butter from breaking, ensuring a glossy, rich pan sauce.
This quick sear technique maximizes surface flavor development before the protein overcooks.
What is the best sauce to use with shrimp?
A classic garlic butter sauce finished with fresh lemon juice is generally considered the best. The fat carries the garlic aroma, while the acid cuts through the richness, balancing the sweet flavor of the shrimp. This works wonderfully with starches like pasta or crusty bread to soak up the remnants.
Can I substitute frozen shrimp for fresh in this recipe?
Yes, frozen shrimp often yields superior texture if thawed and prepped correctly. The most critical step is ensuring you thoroughly pat the shrimp dry after thawing to remove all surface moisture. Moisture prevents searing and results in a steamed, watery sauce.
Is it true that I must use unsalted butter for this sauce?
No, using salted butter is generally fine, but unsalted offers better control over the final seasoning. Since salt content varies widely between butter brands, using unsalted allows you to season precisely after deglazing.
This control is crucial, especially if you are serving this alongside a heavily seasoned side dish like our Scalloped Potatoes Recipe.
How long should I cook shrimp to avoid a tough, rubbery texture?
Cook shrimp until they form a loose "C" shape and are just opaque, usually 2-4 minutes total cooking time. They continue to cook slightly after being removed from the heat (carryover cooking), so pull them when they are still slightly translucent in the very center.
Overcooking is the primary cause of toughness.
Garlic Butter Shrimp In 10 Mins