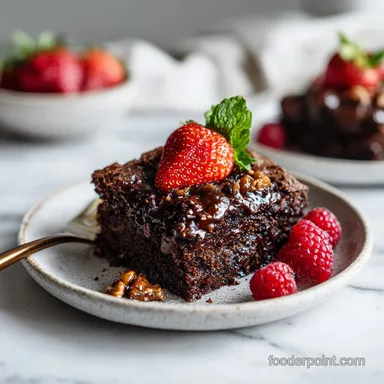
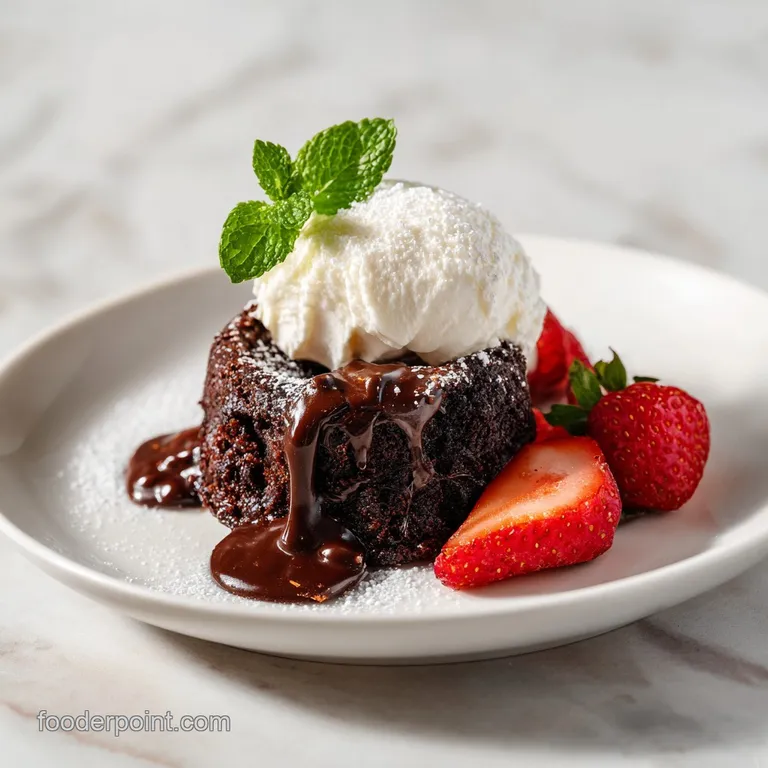
Death by Chocolate Dump Cake: Molten and Rich
- Time: Active 5 minutes, Passive 35 minutes, Total 40 minutes
- Flavor/Texture Hook: Molten, velvety center with a crisp chocolate chip crust
- Perfect for: Last minute dinner parties or intense late night chocolate cravings
- Mastering the Ultimate Death by Chocolate Dump Cake Recipe
- Essential Ingredients and Smarter Substitutions for Success
- Key Specs for the Perfect Fudgy Chocolate Bake
- The Science of the No Stir Layering Method
- Component Analysis for Peak Chocolate Performance
- The Simple Tools Needed for Your Dessert Creation
- Step by Step Guide to a Molten Chocolate Masterpiece
- Common Baking Hurdles and How to Fix Them
- Guidelines for Adjusting the Batch Size
- Debunking Classic Dump Cake Misconceptions
- Keeping Your Leftovers Moist and Reheating Guidelines
- The Best Toppings to Balance Intense Cocoa Flavors
- Recipe FAQs
- 📝 Recipe Card
Mastering the Ultimate Death by Chocolate Dump Cake Recipe
Imagine walking into a kitchen where the air is heavy with the scent of melting dark chocolate and a whisper of roasted espresso. As the oven door creaks open, a cloud of cocoa scented steam hits you, and you see the edges of the cake bubbling with a dark, glossy intensity.
That is the moment you realize this isn't just a simple box mix hack; it is a rich, molten experience that feels far more sophisticated than its humble name suggests.
I remember the first time I tried making a dump cake. I was skeptical. How could something you don't even stir turn into anything other than a sandy mess? But then I pulled it out of the oven, and the center was still wobbling slightly while the chocolate chips had formed a "velvety" layer across the top.
One bite of that warm, gooey center changed my perspective on "easy" desserts forever. It’s the kind of treat that makes you want to hide the pan so you don't have to share.
We've all had those days where we want a decadent dessert but the thought of cleaning four bowls and a whisk feels like a mountain we can't climb. This recipe is the answer to that struggle.
It’s designed to be assembled directly in the pan, saving your sanity while delivering a texture that mimics a high end lava cake. Trust me, once you see how that pudding layer transforms the dry mix into a fudgy masterpiece, there’s no going back to standard sheet cakes.
Essential Ingredients and Smarter Substitutions for Success
Finding the right balance of fats and sugars is what keeps this from being cloyingly sweet. The use of dark chocolate elements provides a sophisticated bitterness that cuts through the sugar.
| Original Ingredient | Substitute | Why It Works |
|---|---|---|
| Whole Milk (355ml) | Oat Milk (Full Fat) | Similar viscosity; adds a subtle toasted grain flavor. |
| Unsalted Butter (115g) | Coconut Oil (Melted) | Provides the necessary fat. Note: Adds a distinct tropical aroma. |
| Dark Cake Mix (430g) | gluten-free Choc Mix | Starch ratios are similar enough for a dense, fudgy result. |
If you are looking for something with a fruity twist, you might enjoy trying a Black Forest version which adds cherries into the mix for a classic flavor profile.
Key Specs for the Perfect Fudgy Chocolate Bake
Before you start pouring, it’s helpful to know exactly how much you’re making. This helps you choose the right serving dishes or decide if you need to double the batch for a larger crowd.
| Servings | Ingredient Adjustments | Pan Size | Cook Time |
|---|---|---|---|
| 6 People | Half all ingredients | 20x20 cm | 25-30 mins |
| 12 People | Standard Recipe | 23x33 cm | 35 mins |
| 24 People | Double all ingredients | Two 23x33 cm | 35 mins |
When you double the recipe, avoid using one massive deep pan. The heat won't penetrate the center properly, leaving you with a burnt exterior and raw flour in the middle. Always stick to the 23x33 cm (9x13 inch) dimensions to ensure the heat circulates evenly around the pudding layer.
The Science of the No Stir Layering Method
Why do we leave the layers separate? It feels wrong, but there is a logic to the madness that results in that signature "molten" texture.
- Hydration Gradient: The pudding mix at the bottom absorbs the milk and the moisture from the butter above, creating a self saucing base.
- Fat Sealing: Melted butter drizzled on top creates a barrier that "fries" the top layer of cake mix, turning it into a soft, cookie like crust rather than a dry sponge.
- Cacao Intensity: Espresso powder doesn't make the cake taste like coffee; it acts as a molecular bridge that enhances our perception of the chocolate's bitterness and depth.
- Density Control: By not stirring, we prevent air from entering the batter, which keeps the cake dense and fudgy instead of light and airy.
Component Analysis for Peak Chocolate Performance
Understanding what each item does helps you troubleshoot on the fly. Don't skip the espresso powder it's the secret weapon here.
| Component | Role in Recipe | Pro Secret |
|---|---|---|
| Instant Pudding | Moisture Reservoir | Use "Instant" only; "Cook & Serve" won't set properly in the oven. |
| Dark Cake Mix | Structural Base | Sift the mix if it looks lumpy to avoid dry flour pockets. |
| Chocolate Chips | Texture Contrast | Use 60% cacao to prevent the dish from becoming overly sweet. |
| Flaky Sea Salt | Flavor Balancer | Add it after baking so the crystals don't dissolve into the batter. |
For those who prefer a more structured treat that you can hold in your hand, a chewy cookie cake offers a similar buttery edge with a firmer center.
The Simple Tools Needed for Your Dessert Creation

You really don't need much for this. In fact, if you're using a fork to whisk the pudding, you don't even need a whisk.
- Baking Dish: A 23x33 cm (9x13 inch) ceramic or glass dish is best. Ceramic holds heat longer, which is great for serving warm.
- Small Saucepan: To melt the butter, though a microwave safe bowl works just as well.
- Measuring Cups: Precision matters for the milk to ensure the pudding doesn't turn into soup.
- Fork or Whisk: Just to combine the pudding and milk in the bottom of the pan.
Chef's Tip: Freeze your chocolate chips for 10 minutes before topping the cake. This slows down their melting point in the oven, ensuring they hold their shape slightly longer and create "shatter" zones in the crust.
Step by step Guide to a Molten Chocolate Masterpiece
- Preheat your oven to 175°C (350°F).
- Grease a 23x33 cm ceramic baking dish thoroughly with butter. Note: This prevents the pudding from scorching onto the sides.
- Pour 355ml of cold whole milk into the bottom of the dish.
- Add 110g of instant chocolate pudding mix to the milk.
- Whisk the milk and pudding lightly with a fork until no large clumps remain.
- Sprinkle 430g of chocolate cake mix evenly over the wet pudding. Note: Do not stir; just use the back of a spoon to level the surface.
- Drizzle 115g of melted unsalted butter over the dry cake mix.
- Ensure the butter covers as much dry powder as possible. until most white/brown spots are dampened.
- Scatter 2 cups of chocolate chips and 1 tsp of espresso powder over the top.
- Bake for 30–35 minutes until the edges gurgle and the center is set but soft.
- Remove from the heat and immediately sprinkle with 0.5 tsp of flaky sea salt.
Common Baking Hurdles and How to Fix Them
The most common issue people face is "dry spots" where the flour didn't meet the fat. This usually happens if the butter was drizzled too quickly in one spot.
Why Your Cake Has Dry Flour Patches
If you see white or light brown dusty spots after 35 minutes, it means the butter didn't reach that area. This happens if you pour the butter in a single stream rather than a zig zag motion.
You can usually fix this by gently pressing a spoon onto the dry spot during the last 5 minutes of baking to let some of the bubbling butter soak in.
| Problem | Root Cause | Solution |
|---|---|---|
| Thin/Runny Center | Milk was too warm | Use milk straight from the fridge to help the pudding set. |
| Burnt Edges | Dark metal pan | Reduce oven temp by 10°C or use ceramic/glass. |
| Gritty Texture | Stirring the layers | Never stir; the layers must remain distinct to hydrate correctly. |
Common Mistakes Checklist
- ✓ Never use "Cook & Serve" pudding; it requires a boil to thicken, which won't happen here.
- ✓ Don't skip the grease; chocolate is high in sugar and will "glue" itself to the pan.
- ✓ Avoid low-fat milk; the fat is necessary to emulsify with the dry cake mix.
- ✓ Check for doneness at 30 minutes; a slight wobble in the very center is perfect.
- ✓ Use a dark cocoa mix (Devil's Food) for the best color and depth.
Guidelines for Adjusting the Batch Size
If you're cooking for a smaller household, you can easily cut this recipe in half. Use a 20x20 cm square pan and reduce the baking time to about 25 minutes. Since you can't easily half an egg (not that this recipe uses them!), the scaling is very straightforward.
When scaling up for a party, do not try to bake two layers in one deep pan. The "dump" method relies on a specific surface area to depth ratio. If the cake is too deep, the bottom pudding will overcook and become rubbery before the butter can hydrate the middle layer of dry mix.
Always use two separate 23x33 cm dishes and rotate them halfway through the 35 minute bake time.
Debunking Classic Dump Cake Misconceptions
One common myth is that you need to use a lot more butter than the recipe calls for to "get rid" of the dry spots. In reality, the pudding layer at the bottom does half the work of hydrating the cake mix from below. Adding too much butter just leads to an oily, heavy dessert that separates.
Another misconception is that you can't use "dark" chocolate because it won't melt properly. Actually, dark chocolate with at least 60% cacao has a better fat to sugar ratio for this bake.
It creates a much more "velvety" mouthfeel than standard milk chocolate chips, which can sometimes turn grainy when overheated in a 175°C oven.
Keeping Your Leftovers Moist and Reheating Guidelines
This cake is arguably better the next day after the flavors have had time to "marry." The pudding keeps the crumb incredibly moist, even when cold.
- Fridge: Store in an airtight container for up to 4 days. The texture will firm up into a fudge like consistency.
- Freezer: You can freeze individual portions for up to 2 months. Wrap them tightly in plastic wrap and then foil to prevent freezer burn.
- Reheating: To get that molten center back, microwave a slice for 20-30 seconds. Don't overdo it, or the chocolate chips will lose their structure.
- Zero Waste Tip: If you have leftover crumbs or a slightly overbaked edge, crumble it over vanilla bean ice cream or blend it into a "death by chocolate" milkshake.
The Best Toppings to Balance Intense Cocoa Flavors
Because this dish is so intensely rich, it cries out for something cold and creamy to act as a counterpoint. A scoop of high-quality vanilla bean ice cream is the classic choice, as the melting cream creates a sort of "ganache" when it hits the warm chocolate.
For a more grown up twist, try a dollop of unsweetened whipped cream with a pinch of cinnamon. The spice highlights the espresso notes in the cake. If you're feeling adventurous, a few fresh raspberries or blackberries provide a necessary tartness that "cuts" through the heavy cacao, making the whole experience feel lighter and more balanced.
Always serve it while it's still warm enough for the chocolate chips to be soft!
Recipe FAQs
What is the biggest mistake to avoid when making a dump cake?
Stirring the layers is the primary error to avoid. You must keep the chocolate cake mix as a distinct dry top layer over the pudding mixture to ensure the signature lava like, fudgy texture develops during the 35-minute bake.
What is the difference between chocolate cake and death by chocolate cake?
It is defined by the intensity of cocoa layers. While a standard cake relies on a single batter, this version stacks liquid pudding, chocolate cake mix, and melted butter to create a dense, molten profile similar to the rich textures found in our fudgy dessert squares.
What makes a cake death by chocolate?
The use of multiple concentrated chocolate elements creates the effect. By combining Devil's Food cake mix, instant chocolate pudding, and two cups of semi sweet chocolate chips, the dessert achieves a level of intensity that defines the name.
How to ensure the cake does not dry out?
Drizzle the melted butter thoroughly over every inch of the dry powder. If any dry flour pockets remain on the surface before you bake at 350°F, they will turn into hard crusts rather than absorbing the butter and milk to become part of the fudgy crumb.
How to achieve the perfect center consistency?
Pull the dish from the oven when the edges are set but the center still wobbles slightly. If you bake until the center is completely firm, you will lose the molten, lava like quality that characterizes this specific dump cake method.
Is it true I can use low-fat milk for this recipe?
No, this is a common misconception. You must use cold whole milk because the fat content is essential to emulsify with the instant pudding and cake mix; lower fat options often result in a thin or grainy texture.
How to store leftovers?
Cover the cooled baking dish tightly with plastic wrap or transfer to an airtight container. It stays fresh in the refrigerator for up to three days, though the texture is best when warmed slightly before serving.
Death By Chocolate Dump Cake