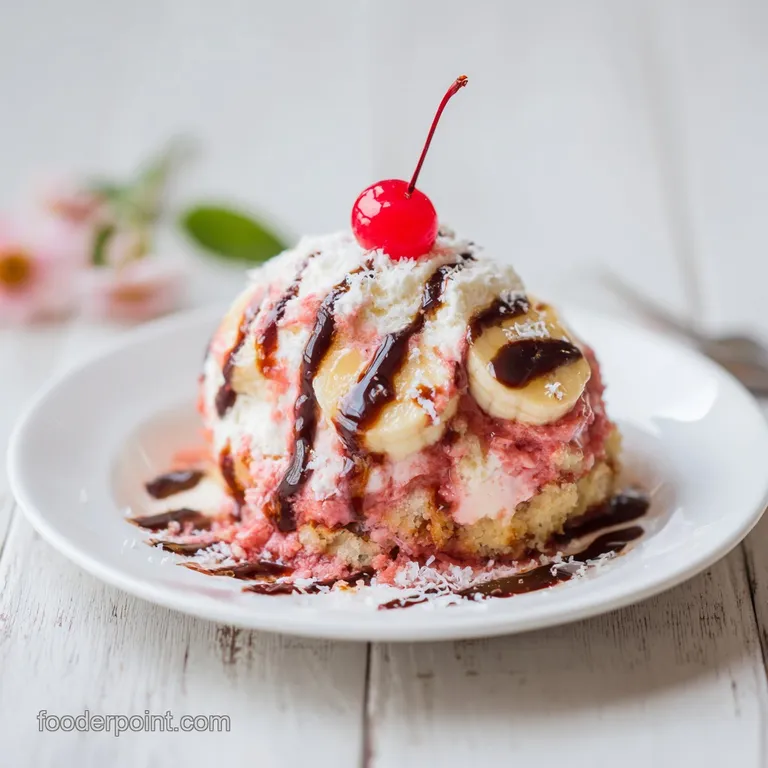
Banana Split Dump Cake: a Warm Tropical Bake

- Time:10 minutes active + 40 minutes baking = 50 minutes total
- Flavor/Texture Hook: Caramelized tropical fruit with a crunch of toasted walnuts and melting chocolate.
- Perfect for: Stress free potlucks or feeding a hungry crowd on short notice.
- Crafting the Best Banana Split Dump Cake Recipe
- Essential Recipe Measurement Details
- Gathering Your Sweet Components
- Necessary Tools for Success
- Mastering the Precision Layering Technique
- Solving Your Baking Problems Easily
- Flavor Variations and Substitution Ideas
- Storage Tips and Waste Reduction
- Perfect Pairings for Every Occasion
- Debunking Dump Cake Beliefs
- Recipe FAQs
- 📝 Recipe Card
Crafting the Best Banana Split Dump Cake Recipe
The first time I pulled this out of the oven, the aroma hit me like a wall of pure nostalgia. It wasn't just sweet; it was the specific scent of a mid summer boardwalk soda fountain.
You know that smell the perfume of macerated strawberries, the bright zing of maraschino cherries, and that unmistakable buttery warmth of a fresh baked cake. It fills the kitchen and lingers in the curtains, making everyone wander toward the stove before the timer even goes off.
But honestly, I used to struggle with dump cakes. My early attempts often came out with weird, dry patches of flour on top or a base so watery it felt like fruit soup. It took a few messy pans to realize that the secret isn't in the ingredients themselves, but in how you handle the moisture migration between the fruit and the dry mix.
This banana split dump cake recipe is my targeted fix for those exact frustrations, ensuring every bite is perfectly hydrated and every inch of the crust has that satisfying crackle.
We're going to use the heavy syrup from the pineapple to do the heavy lifting. Instead of draining it away, that liquid is what actually "cooks" the cake mix from the bottom up, while the butter melts down to meet it. It’s a beautiful, symbiotic relationship happening inside your 9x13 dish.
You'll get the velvet texture of the bananas and the snappy bite of the walnuts in one go. Let’s get into why this method actually works and how to avoid the pitfalls of a powdery topping.
Essential Recipe Measurement Details
Hydration Balance: The syrup from the crushed pineapple acts as the primary moisture source. It travels upward as it heats, hydrating the starch in the cake mix.
Fat Saturation: Placing cold butter in a precise grid pattern ensures that as the fat melts, it coats every pocket of dry flour. This prevents the dreaded "flour plumes" that ruin the texture.
Sugar Caramelization: The high sugar content in the fruit fillings reacts with the heat to create a bubbling, jam like consistency. This thickens the base without needing added cornstarch or flour.
Thermal Insulation: The dense layer of bananas and walnuts protects the delicate chocolate chips from burning. It keeps them in a state of soft, melty perfection rather than turning them bitter and charred.
| Servings | Ingredient Adjustments | Pan Size | Cook Time |
|---|---|---|---|
| 6 people | Use 1/2 of all ingredients | 8x8 inch square | 35 minutes |
| 12 people | Standard recipe quantities | 9x13 inch rectangle | 40 minutes |
| 24 people | Double ingredients (two pans) | Two 9x13 dishes | 45 minutes |
This table helps you plan for everything from a quiet family night to a massive neighborhood block party. When you double the recipe, avoid using one giant pan; instead, use two separate 9x13 dishes to ensure the heat circulates evenly around the edges.
If you try to bake a double thick layer in one pan, the center will remain raw and doughy while the edges burn to a crisp.
Gathering Your Sweet Components
| Component | Role | Pro Secret |
|---|---|---|
| Crushed Pineapple | Moisture Base | Use the heavy syrup version to ensure the cake mix fully hydrates. |
| Yellow Cake Mix | Structural Crust | Sift the mix directly over the fruit to avoid large clumps that resist melting. |
| Unsalted Butter | Crisp Factor | Freeze the butter for 10 minutes before slicing to get those perfect, thin pats. |
For this bake, we are using specific quantities to ensure the ratio of fruit to crust is spot on. You will need 3 large ripe bananas, sliced into 1/2 inch rounds. Make sure they have a few brown spots; the extra sugar in ripe bananas makes them melt into a custard like texture during the 40 minutes in the oven.
You'll also need 1 can (20 oz) of crushed pineapple in heavy syrup. Do not drain this! That syrup is the lifeblood of the dish.
Next, grab 1 can (21 oz) of strawberry pie filling and 1 jar (10 oz) of maraschino cherries. I like to drain and halve the cherries so you get a bit of that vibrant red in every single spoonful. For the topping, 1 box (15.25 oz) of yellow cake mix provides the classic buttery flavor.
You’ll top that with 3/4 cup of unsalted butter, sliced into 24 thin pats. Finally, 1/2 cup of chopped walnuts and 1/2 cup of semi sweet chocolate chips provide the essential "split" crunch. If you prefer a darker profile, you can swap the yellow mix for a chocolate one.
Necessary Tools for Success
You don't need a stand mixer or even a whisk for this one, which is the beauty of a dump cake. The most important tool in your arsenal is a standard 9x13 inch baking dish. A glass dish like a Pyrex is great because you can actually see the fruit bubbling at the bottom, which is a key doneness cue.
I also highly recommend using an offset spatula. After you "dump" the cake mix, you need to level it out without pressing it down. A light touch is what keeps the cake airy instead of leaden.
A sharp chef's knife is necessary for those 1/2 inch banana rounds. Try to keep them uniform so they soften at the same rate. You will also need a small cutting board for the walnuts and cherries.
While it might be tempting to use a food processor for the nuts, I find that hand chopping them gives you a better mix of fine dust and chunky pieces, adding more interest to the crust. Finally, make sure you have a reliable timer.
Since ovens vary, that 40 minutes is a baseline, but the visual cues are your true guide.
Mastering the Precision Layering Technique
- Preheat your oven to 350°F (175°C). Ensure the rack is in the center position for even heat distribution.
- Pour the entire 20 oz can of crushed pineapple, including the syrup, into the bottom of an ungreased 9x13 inch baking dish. Spread it into an even layer using the back of a spoon.
- Distribute the 3 sliced bananas evenly over the pineapple. Note: Placing bananas directly on the pineapple keeps them moist and prevents them from oxidizing or turning grey.
- Spoon the 21 oz of strawberry pie filling in dollops over the bananas, then scatter the 10 oz of halved maraschino cherries. You should start to smell the bright, fruity aroma of the berries mingling with the tropical pineapple.
- Sprinkle the 15.25 oz of dry cake mix evenly over the fruit layer. Use an offset spatula to level the powder without packing it down. Note: Packing the flour prevents the butter from seeping through.
- Place the 24 cold butter pats in a grid pattern across the top of the cake mix. Ensure maximum coverage, especially near the corners where the cake tends to stay dry.
- Scatter the 1/2 cup of chopped walnuts and 1/2 cup of semi sweet chocolate chips over the butter layer.
- Bake for 40 minutes until the top is mahogany colored and crisp. You will hear a steady sizzle and see the fruit juices bubbling vigorously at the edges.
- Remove from the oven and let it sit for at least 15 minutes. This resting period allows the molten fruit base to set so it doesn't run all over the plate when served.
Solving Your Baking Problems Easily
The most common issue people face with this banana split dump cake recipe is a patchy, floury top. This usually happens because the butter didn't reach every part of the cake mix. If you see white spots of dry flour halfway through the bake, don't panic.
You can gently mist those spots with a bit of cooking spray or add a tiny sliver of extra butter right on top of the dry area. It will melt in and save the texture before the timer is up.
Another frustration is a "soupy" consistency. If your fruit layer seems too thin or watery after 40 minutes, it likely needs another 5 to 10 minutes of bake time. The bubbling juices need time to reduce and thicken into a jam.
Watch for the bubbles to move from the edges toward the center. Once the center is bubbling and the walnuts smell toasted, you are in the clear. Trust the mahogany color of the crust; a pale dump cake is often an undercooked one.
Managing Fruit Moisture Levels
If your bananas are extremely overripe, they will release more liquid than firmer ones. To compensate, make sure your strawberry filling is at room temperature before adding it. This allows the heat to penetrate the center of the dish faster, evaporating excess moisture before the crust burns.
Achieving the Shatter Crust
The texture of the top layer depends entirely on the butter temperature. If the butter is too soft when it goes in, it soaks into the flour immediately. Using cold pats allows the butter to melt slowly, "frying" the top of the cake mix into a crisp, cookie like shell that shatters when your spoon hits it.
| Problem | Root Cause | Solution |
|---|---|---|
| Dry flour spots | Uneven butter distribution | Use a grid of 24 pats to ensure full coverage. |
| Burnt walnuts | Rack too high in oven | Move dish to the center rack and tent with foil if needed. |
| Mushy bananas | Slices too thin | Keep rounds at 1/2 inch thickness to maintain structural integrity. |
Working through these small hurdles makes the difference between a "fine" dessert and one that people ask for the recipe for. I've found that consistency is key. By following a simple checklist, you can eliminate these errors before they even start. It’s all about the preparation phase.
- ✓ Sift the cake mix to remove large lumps before sprinkling
- ✓ Use cold, sliced butter rather than melted butter for a crisper top
- ✓ Check your oven temperature with an external thermometer
- ✓ Allow the cake to rest for 15 minutes before serving to set the juices
- ✓ Spread the fruit fillings all the way to the corners of the dish
Flavor Variations and Substitution Ideas
If you want to take this in a different direction, the "dump" method is incredibly forgiving. For instance, if you're a fan of deeper, more tart flavors, you might want to try a 3 Ingredient Cherry Dump Cake as a base and then add the bananas and chocolate chips on top. The tartness of the cherries cuts through the sweetness of the yellow cake mix beautifully. You could even swap the walnuts for pecans if you prefer a richer, more buttery nut flavor.
Another fun twist is to go "Tropical Split." Replace the strawberry filling with a mango or peach pie filling. The combination of mango, pineapple, and banana creates a vibrant, sunshine filled dessert that feels a bit lighter. If you're catering to chocolate lovers, use a devil's food cake mix instead of yellow.
The dark chocolate crust against the bright red cherries and yellow bananas creates a stunning visual contrast that looks much more "artisanal" than a standard dump cake.
| Original Ingredient | Substitute | Why It Works |
|---|---|---|
| Yellow Cake Mix | Chocolate Cake Mix | Adds a rich, cocoa heavy finish. Note: Makes it taste more like a brownie sundae. |
| Walnuts | Toasted Pecans | Pecans have a higher oil content and add a softer, buttery crunch. |
| Strawberry Filling | Raspberry Filling | Adds a sharper tartness that balances the sweet bananas. |
The beauty of these swaps is that they don't change the cooking time or temperature. You can stick to the 350°F and 400 minutes regardless of the fruit or cake mix you choose.
Just keep an eye on the bubbling juices; some fruits like peaches might take an extra 5 minutes to fully thicken compared to strawberries.
Storage Tips and Waste Reduction
Leftovers of this banana split dump cake recipe actually hold up surprisingly well because the moisture from the fruit keeps the cake from drying out. Store any remaining portions in an airtight container in the fridge for up to 4 days.
When you're ready for round two, I recommend reheating it in the oven at 300°F for about 10 minutes rather than using the microwave. This helps the buttery crust regain some of its original crunch, whereas the microwave tends to make the whole thing a bit soft.
For long term storage, you can freeze individual portions. Wrap them tightly in plastic wrap and then foil; they will stay fresh for up to 3 months. To serve from frozen, let it thaw in the fridge overnight and then warm it up. On the zero waste front, don't toss the leftover maraschino cherry juice!
It’s essentially a flavored simple syrup. I love using it to sweeten iced tea or as a base for a quick glaze for fruit salads. Even the banana peels can be used to make a "compost tea" for your houseplants nothing goes to waste in a smart kitchen.
Perfect Pairings for Every Occasion
While this cake is a star on its own, it practically screams for a scoop of cold vanilla bean ice cream. The heat from the bubbling fruit melts the ice cream into a silky sauce that weaves through the walnuts and cake. If you're looking for something slightly different but still in the same flavor family, you might serve a small dish of this alongside a classic banana pudding for a full scale banana themed dessert bar. The creamy texture of the pudding provides a lovely counterpoint to the crispy top of the dump cake.
If you want to keep things lighter, a dollop of unsweetened whipped cream with a hint of lime zest works wonders. The acidity in the lime cuts through the heavy sugar of the pie filling and brightens the whole dish.
For a real "showstopper" presentation, drizzle a little extra chocolate syrup over the top and add a single whole maraschino cherry with the stem still attached. It’s those small, creative twists that make a simple dump cake feel like a high end treat.
Debunking Dump Cake Beliefs
One of the biggest myths in the baking world is that you have to melt the butter before pouring it over a dump cake. I've tested this both ways, and melted butter often leads to a greasy, heavy texture because it saturates the flour too quickly.
Cold pats of butter are the way to go because they create steam as they melt, which helps the cake rise slightly and creates that signature crispy "cap" on top. Searing the flour with cold fat is the secret to that golden, mahogany finish.
Another misconception is that you need to stir the layers. People often feel the urge to mix the fruit and the cake mix together, thinking it will help it cook more evenly. Do not do this! The "dump" method relies on the steam from the bottom layer traveling through the dry layer to cook it.
If you stir them, you end up with a dense, purple grey mush that lacks the distinct textures of fruit, cake, and crunch. Trust the process and let the oven do the work of combining the flavors.
Finally, some say you can't make a dump cake with fresh fruit. While canned fillings are easier, you absolutely can use fresh strawberries or pineapple. However, you must add about 1/4 cup of sugar and a tablespoon of lemon juice to the fresh fruit first to encourage them to release their juices.
Without that extra liquid, the cake mix will stay dry and powdery. For the most consistent results, the "classic" canned versions provided in the recipe are the gold standard for that perfect, gooey crisp balance.
Recipe FAQs
What is the biggest mistake to avoid when making a dump cake?
Do not stir the cake mix into the fruit. You must leave the dry cake mix as a loose layer on top to allow the butter to melt through and create that signature crisp crust.
How to make an easy banana split?
Layer your ingredients directly in a 9x13 baking dish. Start with the crushed pineapple, follow with sliced bananas, dollops of strawberry pie filling, and halved cherries, then finish by covering everything with the dry cake mix and butter pats before baking for 40 minutes at 350°F.
How do you keep dump cake from being soggy?
Ensure even butter coverage across the entire surface of the cake mix. If you miss spots, the dry powder won't hydrate properly, but using thin pats in a grid pattern ensures the moisture remains balanced, much like how we achieve even browning in other baked desserts.
What is the old school banana split?
No, this is a common misconception. The traditional version is a chilled ice cream sundae, whereas this recipe is a baked, warm dessert that mirrors those classic flavors using pineapple, bananas, strawberries, and chocolate.
Can I use a different type of fruit filling?
Stick to the specified strawberry pie filling to maintain the recipe's integrity. Changing the fruit density or liquid content will drastically alter the bake time and the consistency of the final crust.
How to tell if the dump cake is fully cooked?
Watch for the mahogany colored top and bubbling edges. The cake is ready when the surface is golden brown and crisp, and the fruit juices are visibly bubbling around the perimeter of the dish after 40 minutes in the oven.
How to store leftover dump cake?
Keep leftovers in an airtight container in the refrigerator for up to 4 days. For the best texture, reheat individual portions in the oven at 300°F for 10 minutes to restore the crispness of the buttered crust.
Banana Split Dump Cake

