Chocolate Lasagna Dessert: Oreo and Cream
- Time:20 minutes active + 4 hours chilling = Total 4 hours 20 minutes
- Flavor/Texture Hook: Shatter crisp Oreo base with a cloud like cream cheese center
- Perfect for: Potlucks, birthday parties, or when you need a "wow" dessert without the stress
- Simple No Bake Chocolate Lasagna Dessert Recipe
- Secret Logic Behind The Layers
- Planning Your Party Portions
- Essential Component Analysis
- The Pantry Shopping List
- The Necessary Kitchen Gear
- Step By Step Assembly
- Fixing Common Texture Issues
- Customizing Your Sweet Treat
- Keeping Your Dessert Fresh
- Serving The Final Slices
- Recipe FAQs
- 📝 Recipe Card
Simple No Bake Chocolate Lasagna Dessert Recipe
Imagine the smell of crushed cocoa cookies and melted butter hitting the air, followed by the cool, sweet scent of vanilla and cream. I remember the first time I brought this to a family gathering.
Everyone was expecting a heavy, savory lasagna, and when I pulled out this chilled, layered masterpiece, the look on my uncle's face was priceless. He took one bite and immediately asked for the recipe, mostly because it felt like eating a giant, structured piece of fudge cake without the effort of baking.
It's the kind of treat that feels a bit like cheating because it's so easy, but it tastes like you spent all day in the kitchen. The magic is in how the layers play off each other. You've got the salty sweet crunch of the Oreos, the tang of the cream cheese, and the deep, rich cocoa of the pudding.
It's a total sensory experience that hits every single sweet note.
This chocolate lasagna dessert recipe is designed for those of us who love a decadent result but hate the stress of a temperamental oven. We're talking about a dessert that actually gets better the longer it sits in the fridge.
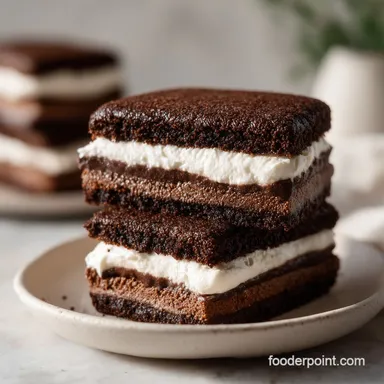
By the time you slice into it, the layers have bonded into a single, velvety cohesive unit that holds its shape on the plate. Let's crack on and get these layers stacked.
Secret Logic Behind The Layers
I used to think no bake desserts were just "pudding in a pan," but there's actually some clever stuff happening here to keep it from becoming a mushy mess.
- Fat Based Stability: The cream cheese acts as a structural anchor. Because it's dense and high in fat, it prevents the whipped cream from collapsing under the weight of the pudding.
- Starch Gelatinization: The instant pudding uses modified cornstarch that thickens almost immediately when hitting the milk. This creates a stable "slab" of chocolate that doesn't bleed into the other layers.
- Moisture Barrier: The melted butter in the Oreo crust seals the cookies. This prevents the moisture from the cream cheese layer from soaking into the base too quickly, keeping that necessary crunch.
- Cold Set Bond: Chilling for 4 hours allows the fats to solidify. This is what gives you those clean, sharp edges when you slice the dessert.
Planning Your Party Portions
Depending on who you're feeding, you might need to scale this up or down. Since it's a heavy dessert, a smaller slice often satisfies most people.
| Servings | Ingredient Adjustments | Pan Size | Total Chill Time |
|---|---|---|---|
| 6 people | Half all ingredients | 8x8 inch square | 4 hours |
| 12 people | Standard recipe | 9x13 inch pan | 4 hours 20 mins |
| 24 people | Double all ingredients | Two 9x13 pans | 5 hours |
Getting the pan size right is everything. If the pan is too large, your layers will be thin and lose that "lasagna" feel. If it's too small, you'll have leftovers of pudding, which, honestly, is a problem most of us are happy to have.
Essential Component Analysis
Before we start mixing, it's helpful to understand what each part of this recipe is actually doing. It's not just about taste; it's about the build.
| Ingredient | Science Role | Pro Secret |
|---|---|---|
| Oreo Crumbs | Structural Base | Pulse them coarsely; a few chunks add better texture |
| Cream Cheese | Emulsifier/Stabilizer | Must be truly room temp to avoid "lumpy" layers |
| Heavy Cream | Aeration | Chill the bowl and whisk for maximum volume |
| Instant Pudding | Thickening Agent | Use cold milk to ensure the starch sets quickly |
Trust me on this: don't skip the chilling of the heavy cream. For those wondering about the stability of whipped cream, Serious Eats explains how fat content keeps the peaks stiff, which is exactly what we need to keep this dessert from sagging.
The Pantry Shopping List
Here is everything you'll need to get this started. I've listed the exact amounts from my tested version to make sure yours comes out just as velvety as mine.
- Oreo cookies, crushed: 24 cookies (340g) Why this? Provides the iconic cocoa crunch foundation
- Substitute: Chocolate graham crackers (similar crunch, slightly less sweetness)
- Unsalted butter, melted: 4 tbsp (57g) Why this? Binds crumbs and adds a salty richness
- Substitute: Coconut oil (melted) for a dairy-free bind
- Cream cheese, softened: 8 oz (225g) Why this? Adds tang and structural stability
- Substitute: Mascarpone (richer, less tangy)
- Powdered sugar: 1/2 cup (100g) Why this? Dissolves instantly for a smooth texture
- Substitute: Finely ground caster sugar (may be slightly grainier)
- Vanilla extract: 1 tsp (5ml) Why this? Enhances the chocolate notes
- Substitute: Almond extract for a more "wedding cake" flavor
- Heavy whipping cream, chilled: 1 cup (240ml) Why this? Creates the airy, fluffy volume
- Substitute: Chilled coconut cream (for a vegan style twist)
- Instant chocolate pudding mix: 1 package (96g) Why this? Fast acting thickener with deep cocoa
- Substitute: Homemade cornstarch chocolate custard (requires cooking)
- Cold whole milk: 2 cups (480ml) Why this? Standard liquid for pudding activation
- Substitute: Almond milk (unsweetened) - note: sets slightly softer
- Whipped topping: 2 cups (480g) Why this? Provides a stable, cloud like finish
- Substitute: Homemade stabilized whipped cream
- Mini chocolate chips: 1/2 cup (60g) Why this? Adds a final snap of texture
- Substitute: Shaved dark chocolate for a more sophisticated look
The Necessary Kitchen Gear

You don't need a professional bakery to pull this off, but a few specific tools make the process much smoother. I usually just grab whatever is in my drawer, but these are the essentials.
- 9x13 inch baking pan: The standard size for the perfect slice.
- Electric hand mixer: Essential for the cream cheese and whipped cream. Doing this by hand is a workout I don't recommend.
- Large mixing bowls: I use two - one for the cream cheese mixture and one for the pudding.
- Rubber spatula: Perfect for folding in the whipped topping without deflating the air.
- Measuring cups and spoons: Precision matters here, especially with the milk and sugar.
- Ziploc bag or food processor: For crushing the Oreos into the perfect "wet sand" consistency.
Step by step Assembly
Right then, let's get to the actual building. The key here is patience. Don't rush the layers, and make sure each one is smooth before adding the next.
Phase 1: Building the Foundation
Combine the crushed Oreo crumbs and melted butter in a bowl until the mixture resembles wet sand. Press the mixture firmly into the bottom of a 9x13 inch pan using the back of a spoon. Note: Press hard so it doesn't crumble when slicing. Put it in the fridge to firm up while you move to the next step.
Phase 2: Creating the Velvety Core
In a large bowl, beat the softened cream cheese and powdered sugar together until smooth. According to King Arthur Baking, softened cream cheese is key to avoiding lumps, so make sure it's truly room temperature. Slowly pour in the heavy whipping cream and vanilla extract, beating on high until stiff peaks form. Gently fold the cream cheese mixture in and spread it evenly over the Oreo crust.
Phase 3: The Cocoa Cascade
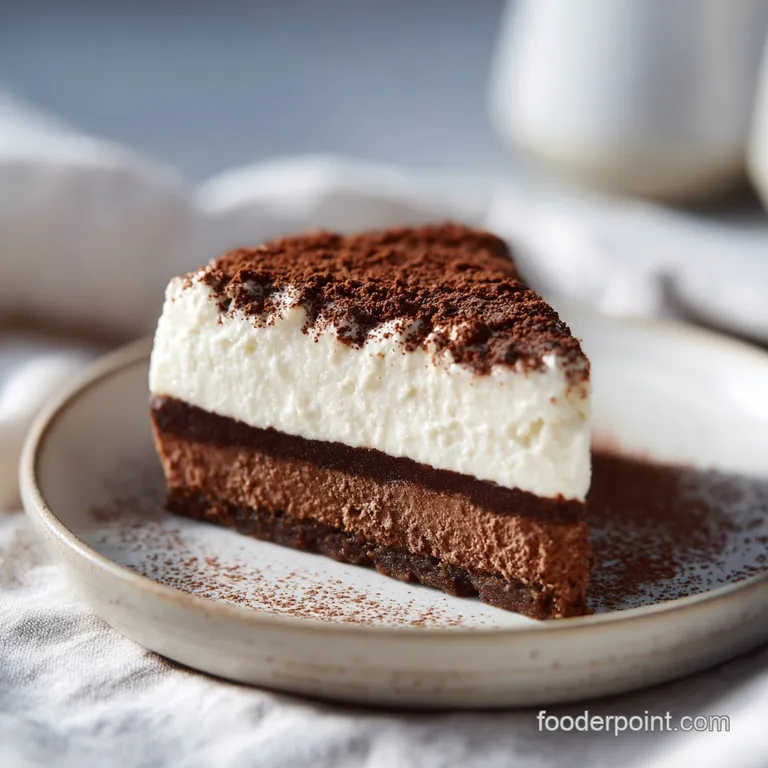
Whisk the instant pudding mix and cold milk together for 2 minutes until the mixture has thickened and looks glossy. Gently fold in one cup of whipped topping to lighten the texture. This is the "secret" that makes it taste like a mousse rather than just pudding.
Pour this mixture over the cream cheese layer, smoothing the top with a spatula.
Phase 4: The Final Flourish
Spread the remaining one cup of whipped topping across the top of the pudding layer. Finish it off by garnishing with mini chocolate chips or chocolate shavings. Now comes the hardest part: refrigerate the dessert for at least 4 hours. This allows the layers to set and the flavors to meld.
Fixing Common Texture Issues
Even the best home cooks hit a snag now and then. Most problems with this chocolate lasagna dessert recipe come down to temperature or mixing speed.
Why Your Cream Layer Is Lumpy
If you see tiny white beads of cream cheese in your second layer, it's because the cheese was too cold. The fat didn't emulsify with the sugar and cream. You can sometimes fix this by gently warming the bowl with a hairdryer on low and re whipping, but it's better to start with soft cheese.
Why Your Pudding Is Too Soft
If the pudding layer doesn't hold its shape, you might have used too much milk or not whisked it long enough. The instant starch needs a full two minutes of agitation to fully bond with the liquid.
| Problem | Root Cause | Solution |
|---|---|---|
| Soggy Crust | Butter didn't bind | Press crumbs firmer; use full butter amount |
| Deflated Topping | Over mixing during folding | Use a spatula; use a "cut and fold" motion |
| Lumpy Cheese | Cold cream cheese | Let cheese sit at room temp for 2 hours |
Common Mistakes Checklist
- ✓ Ensure cream cheese is fully softened before beating
- ✓ Use cold milk for the pudding to trigger the thickening
- ✓ Fold whipped topping gently to keep the air bubbles
- ✓ Chill for a full 4 hours; 2 hours is not enough for a clean slice
- ✓ Use a sharp, warm knife for the cleanest cuts
Customizing Your Sweet Treat
Once you've mastered the base chocolate lasagna dessert recipe, you can start playing with the flavors. I love changing the "vibe" of the dessert depending on the season.
- Rich & Nutty
- Add a layer of peanut butter mixed with a bit of powdered sugar between the crust and the cream cheese.
- Fresh & Bright
- Top with fresh raspberries or sliced strawberries to cut through the richness.
- The "Hot Chocolate" Twist
- Stir in a pinch of cinnamon and a dash of nutmeg into the pudding layer.
If you're in the mood for something with cherries, my Black Forest Dump Cake is a killer alternative. Or, if you want something a bit more "candy shop," try swapping the mini chips for crushed candy canes during the winter months.
Decision Shortcut If you want it less sweet, use dark chocolate shavings instead of mini chips. If you want a firmer set, increase the chilling time to 6 hours. If you want a lighter taste, replace the whipped topping with homemade whipped cream.
Keeping Your Dessert Fresh
Because of the dairy and the pudding, this treat needs to stay cold. It doesn't handle room temperature well and will begin to soften after about 30 minutes on the table.
Storage Guidelines Keep the dessert in the refrigerator, tightly covered with plastic wrap or in an airtight container. It stays fresh for 4 to 5 days. If you have a sweet tooth for something denser, these Rocky Road Brownies satisfy that same craving and have a similar shelf life.
Freezing Instructions You can freeze this dessert for up to 1 month. I recommend freezing it in slices wrapped in parchment paper and foil. To thaw, move a slice to the fridge overnight. Don't thaw it on the counter, or the layers might separate.
Zero Waste Tips If you have leftover Oreo crumbs, mix them into your morning yogurt or use them as a topping for vanilla ice cream. Any leftover whipped topping can be folded into a fruit salad for a quick dessert.
Serving The Final Slices
Presentation is half the battle with a layered dessert. You want people to see those distinct stripes of cocoa and cream.
The best way to serve this is with a hot, damp knife. Run your knife under hot water, wipe it dry, and make one clean slice. Wipe the knife again between every single cut. If you don't, the pudding will smear into the cream cheese, and you'll lose those beautiful lines.
Serve it on a chilled plate to keep the structure intact. I like to add a single fresh mint leaf or a whole Oreo cookie on top of each slice for that professional bakery look. It's a rich dessert, so a small square is usually plenty, but don't tell the guests that - let them go back for seconds!
Recipe FAQs
How to get a firm Oreo crust?
Press the Oreo and butter mixture firmly into the pan using the back of a spoon. Refrigerate the crust before adding subsequent layers to ensure it doesn't crumble during slicing.
Is it true that this dessert needs to be baked to set?
No, this is a common misconception. This is a no-bake recipe that relies entirely on refrigeration to firm up the cream cheese and pudding layers.
How to avoid lumps in the cream cheese layer?
Beat the softened cream cheese and powdered sugar together until smooth before adding other liquids. Ensure the cream cheese is completely softened to room temperature to prevent clumps.
How long must the dessert refrigerate before serving?
Refrigerate for at least 4 hours. This time is critical for the pudding and cream cheese layers to set properly, allowing for clean, distinct slices.
Can I prepare this dessert a day in advance?
Yes, it stores well overnight. Making it 24 hours early allows the flavors to meld and ensures the texture is perfectly stable.
How to make the pudding layer fluffier?
Gently fold in one cup of whipped topping after the pudding has thickened. If you enjoyed mastering this creamy folding technique here, see how the same principle works in our banana pudding.
Why is the pudding layer too soft or runny?
Whisk the instant pudding mix and milk for a full 2 minutes. Stopping too early prevents the mixture from thickening sufficiently, regardless of refrigeration time.
Chocolate Lasagna Dessert