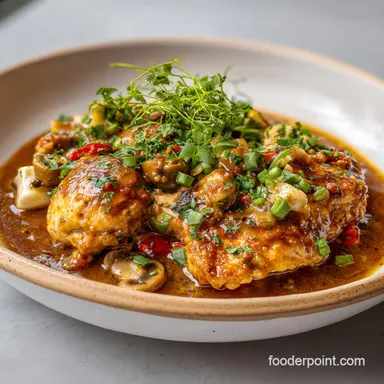
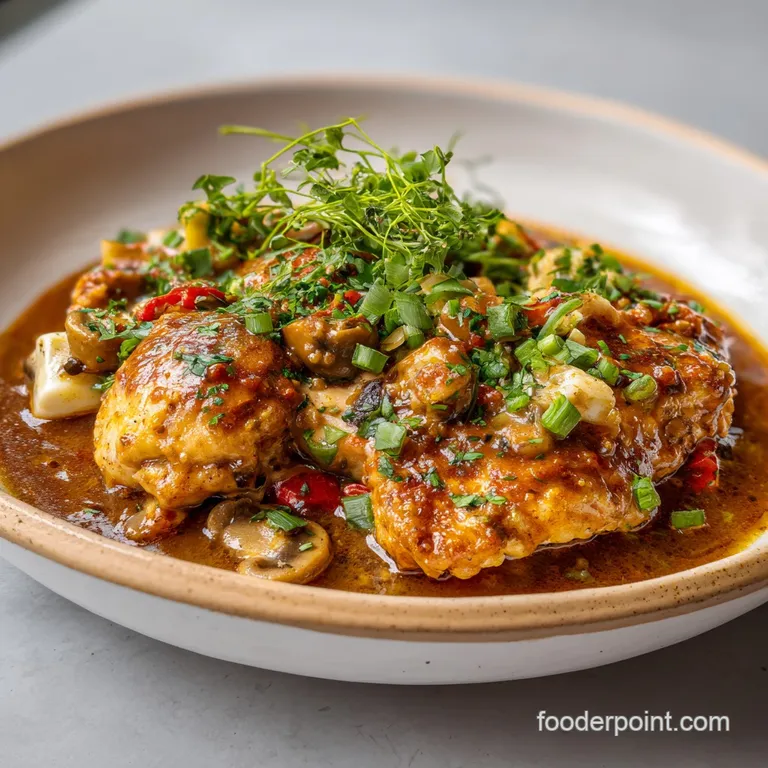
Southern Smothered Chicken: Crispy and Silky
- Time: Active 15 minutes, Passive 35 minutes, Total 50 minutes
- Flavor/Texture Hook: Shatter crisp skin meets a silky, savory mahogany gravy
- Perfect for: Comforting Sunday family dinners or a hearty weeknight reward
- Why This Technique Actually Works
- Mastering the Elements of Gravy
- Tools Required for Success
- Step by Step to Perfection
- Solving Common Smothered Chicken Issues
- Flavor Variations and Smart Swaps
- Storing and Reheating Your Meal
- Best Sides to Serve With Chicken
- Very High in Sodium
- Recipe FAQs
- 📝 Recipe Card
You have probably heard that "real" Southern cooking is a mystery passed down through secret handshakes or that it requires a literal whole day of standing over a hot stove. People act like if you don't have a 100 year old cast iron skillet and a grandmother from Georgia watching over your shoulder, you shouldn't even bother trying.
Honestly, that is a total myth. You do not need a culinary degree or a secret vault of spices to pull off a plate of chicken that makes people go quiet while they eat.
The real magic of this dish isn't in a long, drawn out process. It is actually about the layers of flavor we build in under an hour. I remember the first time I tried making this. I thought I could skip the searing step and just toss everything into a pot.
It was a disaster, a beige, soggy mess that tasted like nothing. But once I learned how to treat the skin and how to properly toast the flour, everything changed. We are talking about a texture that starts with a crunch and ends with meat that basically falls off the bone.
We are going to focus on what actually matters here: getting that deep, mahogany color on the chicken and building a gravy that has enough body to coat a spoon without being gummy.
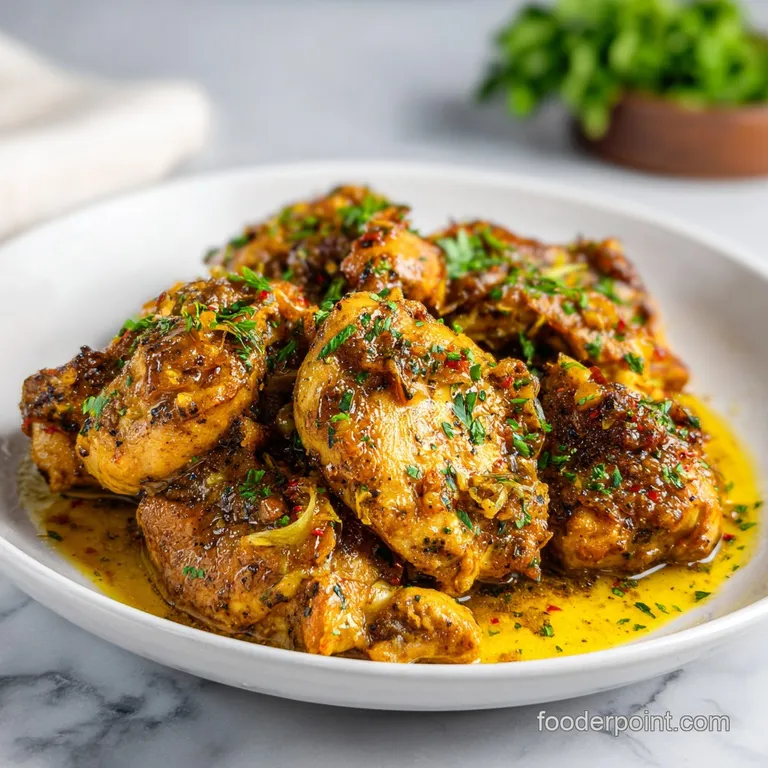
Forget everything you have heard about this being "heavy" or "difficult." It's hearty, it's honest, and it is going to be the best thing you put on your table this week. We are keeping it budget friendly by using thighs, which stay much juicier than breasts anyway.
Let's get into why this method works every single time.
Why This Technique Actually Works
The Maillard Magic: Searing the chicken skin side down at a high heat creates a complex flavor profile and a "shatter" texture that stands up to the gravy.
Roux Development: Cooking the reserved seasoned flour in the chicken fat and butter removes the "raw" graininess and adds a toasted, nutty depth.
The Thigh Advantage: Using bone in, skin on thighs is vital because the bone provides insulation and the skin provides the fat needed for the silky sauce.
Collagen Breakdown: Simmering the chicken to an internal temperature of 80°C (175°F) allows the connective tissue to soften, resulting in a velvety mouthfeel.
Flavor Layering: Adding the garlic only after the onions have softened ensures the aromatics don't burn and turn bitter during the long simmer.
| Chicken Thickness | Internal Temp | Rest Time | Visual Cue |
|---|---|---|---|
| 2.5 cm (1 inch) | 80°C (175°F) | 5 minutes | Juices run completely clear |
| 4 cm (1.5 inches) | 80°C (175°F) | 7 minutes | Meat pulls away from bone |
| 5 cm (2 inches) | 80°C (175°F) | 10 minutes | Skin is deep mahogany brown |
When you are choosing your chicken, aim for pieces that are roughly the same size. This helps everything cook evenly so you don't end up with one piece that is dry while another is still tough.
Thicker thighs will naturally take a bit longer to reach that sweet spot of 80°C, but they are much more forgiving than other cuts.
Mastering the Elements of Gravy
| Component | Science Role | Pro Secret |
|---|---|---|
| All Purpose Flour | Starch Thickener | Sift it before dredging to prevent clumps in your finished sauce. |
| Smoked Paprika | Color and Depth | The oil in the pan "blooms" the spice, making the gravy dark and earthy. |
| Chicken Stock | Liquid Base | Use warmed stock to prevent the fat from seizing when you build the roux. |
For this recipe, we are using 3 lbs (1.36 kg) of chicken thighs. I highly recommend sticking with bone in. The bone acts as a thermal conductor, cooking the meat from the inside out while the gravy cooks it from the outside in. This double sided heat is why the meat gets so tender. If you prefer a different profile, you might enjoy my creamy chicken variation which uses a similar pan searing technique but with a different flavor twist.
Essential Ingredients and Smart Substitutes
- 3 lbs bone in, skin on chicken thighs: Why this? They stay juicy and provide the essential fat for the gravy base.
- Substitute: Chicken drumsticks. They have similar fat content and cook times.
- 1 cup all purpose flour: Why this? It creates the crust and serves as the thickener for the roux.
- Substitute: Cornstarch (use half the amount) if you need a gluten-free thickener.
- 1 tbsp smoked paprika: Why this? Provides that signature mahogany color and a hint of woodsy flavor.
- Substitute: Regular paprika with a drop of liquid smoke.
- 1 tbsp garlic powder & 1 tsp onion powder: Why this? Seasons the meat deeply through the flour coating.
- Substitute: 1 tbsp of all purpose poultry seasoning.
- 3 tbsp neutral oil: Why this? It has a high smoke point for a hard sear.
- Substitute: Avocado oil or refined coconut oil.
- 1 large yellow onion, thinly sliced: Why this? They melt into the gravy for a natural sweetness.
- Substitute: Shallots for a more delicate, garlicky onion vibe.
- 1/4 cup unsalted butter: Why this? Adds richness and helps the flour toast properly.
- Substitute: Ghee or more neutral oil for a dairy-free option.
- 3 cups chicken stock, warmed: Why this? The foundation of the gravy flavor.
- Substitute: Vegetable stock or water with bouillon base.
- 1/2 cup heavy cream: Why this? Rounds out the salt and spice with a silky finish.
- Substitute: Full fat coconut milk (adds a slight nutty note).
Tools Required for Success
You don't need a kitchen full of gadgets, but a heavy bottomed skillet is non negotiable here. I prefer a 12 inch cast iron or a heavy stainless steel Dutch oven. The weight of the pan helps maintain a consistent temperature when you drop the cold chicken into the oil.
If the pan is too thin, the temperature will plummet, and your chicken will steam rather than sear.
You will also want a set of sturdy tongs. Moving the chicken around without tearing the skin is much easier with tongs than with a fork. A wire rack is another little trick I use. When you pull the chicken out after searing, putting it on a rack instead of a flat plate keeps the bottom from getting soggy while you make the gravy.
It's those small details that separate a good meal from a legendary one.
Step by step to Perfection
- Whisk together 1 cup flour, 1 tbsp paprika, 1 tbsp garlic powder, 1 tsp onion powder, 2 tsp salt, 1 tsp cayenne, and 1 tsp black pepper in a shallow dish.
- Pat 3 lbs of chicken thighs completely dry with paper towels. Note: Moisture is the enemy of a good sear.
- Dredge each chicken piece in the flour, shaking off every bit of excess. Reserve the leftover flour.
- Heat 3 tbsp oil in your skillet over medium high heat. Sear chicken skin side down for 5-7 minutes until deep mahogany brown.
- Flip the chicken and sear for another 5 minutes. Remove and place on a wire rack.
- Drop the heat to medium and add 1/4 cup butter. Sauté 1 sliced onion for 5 minutes until translucent and softened.
- Stir in 3 cloves minced garlic and cook for 60 seconds until the kitchen smells like heaven.
- Whisk 3 tbsp of the reserved flour into the fat. Cook for 2 minutes until it looks like wet sand.
- Slowly pour in 3 cups warm stock and 1/2 cup heavy cream, whisking constantly until the sauce is silky and thick.
- Return the chicken and 2 thyme sprigs to the pan. Cover and simmer for 15-20 minutes until chicken hits 80°C.
Chef's Note: If your gravy looks too thick before you even add the chicken back, don't panic. Just whisk in another 1/4 cup of stock. The chicken will release its own juices as it simmers, which will thin the sauce naturally.
Solving Common Smothered Chicken Issues
The Gravy is Lumpy
This usually happens when you add cold liquid to a hot roux too quickly. The flour particles clump together instead of suspending in the liquid. To fix this, you can use an immersion blender to smooth it out before adding the chicken back, or simply pass the gravy through a fine mesh strainer.
Next time, remember to whisk like your life depends on it while drizzling the stock in slowly.
The Coating Slips Off
If your flour coating slides off like an oversized sweater, it is because the chicken was damp when you dredged it. The flour needs to bond to the skin. If there is a layer of water there, it creates steam that pushes the coating away. Always spend an extra minute with the paper towels.
Also, don't move the chicken too early in the pan. Let that crust form before you even think about flipping it.
| Problem | Root Cause | Solution |
|---|---|---|
| Bland Gravy | Not enough salt or "fond" | Scrape the brown bits from the pan bottom and add more salt. |
| Tough Meat | Under simmered | Keep simmering! Thighs need time for the collagen to melt. |
| Greasy Sauce | Too much fat left in pan | Skim the excess oil with a spoon before adding the flour. |
Common Mistakes Checklist
- ✓ Never crowd the pan; sear in batches if needed to keep the heat high.
- ✓ Do not skip the "flour cooking" stage; raw flour tastes like paste.
- ✓ Use warm stock to keep the emulsion stable and smooth.
- ✓ Leave the skin on; it's the primary flavor driver for the entire dish.
- ✓ Use a thermometer to hit 80°C (175°F) for that specific "fall off-the bone" texture.
Flavor Variations and Smart Swaps
If you are looking for a shortcut on those extra busy nights, you can actually adapt this into a chicken tortellini soup style base by adding more stock and some pasta, though the classic version is hard to beat. For a budget friendly twist, you can use whole chicken legs which are often even cheaper than thighs. Just give them an extra 5 minutes of simmer time since they are larger.
Stovetop vs Oven Comparison
| Method | Cooking Time | Resulting Texture |
|---|---|---|
| Stovetop | 50 minutes total | More control over gravy thickness and onion caramelization. |
| Oven (180°C) | 65 minutes total | Hands off approach; more even heat but less "crunch" on the skin. |
If you want a different vibe, try this:
- For a spicy kick: Double the cayenne and add a tablespoon of hot sauce to the gravy.
- For a mushroom version: Sauté 200g of sliced cremini mushrooms with the onions.
- For a lighter touch: Replace the heavy cream with Greek yogurt (whisk it in at the very end off the heat).
Storing and Reheating Your Meal
Smothered chicken is one of those rare dishes that actually tastes better the next day. The flavors in the gravy continue to meld as it sits. You can keep it in an airtight container in the fridge for up to 4 days. When you reheat it, do it on the stove over low heat.
The gravy will have thickened into a jelly like consistency (that's the gelatin from the chicken bones!), so add a splash of water or stock to loosen it up.
You can freeze this dish for up to 3 months. Just make sure it is completely cool before putting it in a freezer bag. To serve, let it thaw in the fridge overnight. For a zero waste tip, don't throw away those onion skins or the ends of the garlic.
Toss them into a bag in your freezer to make your own chicken stock later. It’s a great way to squeeze every bit of value out of your grocery bill.
Best Sides to Serve With Chicken
The most classic way to serve this is over a pile of white rice or creamy mashed potatoes. You want something that can act as a sponge for that incredible gravy. I also love serving it with some braised collard greens or honey glazed carrots to cut through the richness of the sauce.
If you have leftover gravy but no chicken, don't you dare toss it. It is incredible over biscuits the next morning or even used as a base for a quick pot pie. This is the kind of cooking that feeds you twice. It's hearty, budget friendly, and honestly, it’s the kind of meal that makes a house feel like a home.
Trust the process, get that sear right, and you’ll be the hero of the dinner table.
Very High in Sodium
910 mg 910 mg (40% 40% of daily value)
The American Heart Association recommends limiting sodium intake to no more than 2,300mg per day, with an ideal limit of about 1,500mg for most adults.
Tips to Reduce Sodium
-
Choose Low-Sodium Chicken Stock-30%
Replace the 3 cups of regular chicken stock with low-sodium or no-salt added chicken stock. This is the biggest contributor to sodium in this recipe.
-
Halve the Added Salt-25%
Reduce the 2 tsp of kosher salt to 1 tsp. You can always add more salt to taste at the table if needed.
-
Boost Flavor with Herbs and Spices
Increase the use of aromatic ingredients like garlic powder, onion powder, smoked paprika, and cayenne pepper. Fresh thyme also adds great flavor without sodium.
-
Use Unsalted Butter-2%
Ensure you are using unsalted butter, as salted butter can contribute extra sodium.
Recipe FAQs
What is smothered chicken?
Smothered chicken is a soul food classic featuring pan-seared bone-in chicken thighs braised in a savory, onion based gravy. By dredging the chicken in seasoned flour before searing, you create a base that thickens the sauce into a rich, velvety coating as it simmers.
What's the secret to the best smothered chicken?
The secret is achieving a deep mahogany sear before the braising process begins. If you enjoyed learning how to develop flavor through Maillard browning here, you will love applying the same technique to our baked ricotta chicken for equally complex results.
Do you cook smothered chicken, covered or uncovered?
Cover it during the final simmering stage. Covering the skillet traps the steam, which is essential for ensuring the meat becomes tender and reaches an internal temperature of 175°F without drying out.
How to cook chicken for diabetic patients?
Focus on portion control and use skinless chicken thighs to reduce total saturated fat. You can also thicken the gravy using a smaller amount of flour or by reducing the stock longer to maintain flavor intensity without relying on excess starch.
Is it necessary to use a Dutch oven?
No, but it is highly recommended. A heavy bottomed skillet or Dutch oven provides the consistent heat retention required to sear the chicken to a deep mahogany brown without burning the spices in the flour coating.
How to prevent the gravy from tasting like raw flour?
Cook the roux for at least two full minutes after whisking the reserved flour into the fat. This specific amount of time allows the flour to toast and bloom, effectively removing the raw, pasty aftertaste before you add the stock and cream.
Can I speed up the searing process?
No, rushing the sear will prevent the crust from forming properly. Moisture is the enemy of a crisp crust, so patting the chicken completely dry and searing undisturbed for the full 5-7 minutes is essential for the structure of the dish.
Southern Smothered Chicken